Transcutaneous Electrical Nerve Stimulation (TENS) therapy has become a popular, non-invasive solution for managing pain effectively. By using low-voltage electrical currents, TENS units help block pain signals and stimulate endorphin release, offering relief from various conditions like chronic back pain, arthritis, muscle soreness, and even sciatica. However, correct electrode pad placement is crucial to maximize the therapy’s benefits.
In this comprehensive guide, you'll discover the best TENS unit electrode pad placement techniques for different pain areas, ensuring safe and effective pain relief. Whether you’re using a TENS machine for lower back pain, knee pain, neck stiffness, or muscle recovery, this guide will help you achieve optimal results while avoiding common mistakes. Let’s dive in!
TENS Electrode Placement for Upper Body and Head
The upper body and head are the closest areas to the brain, requiring extra caution when using TENS, as improper placement could have unintended effects. To relieve pain in this area, the correct way to position the electrodes is as follows:
Cheekbone Fracture
A cheekbone fracture (zygomatic bone fracture) is a break in the zygomatic bone, often caused by direct trauma from falls, sports injuries, or accidents. Symptoms typically include pain, swelling, bruising, facial asymmetry, and difficulty chewing or opening the mouth. In some cases, there may be numbness due to nerve involvement.
- Prepare the skin: Clean the treatment area with a damp cloth to remove oils or lotions. Ensure there are no open wounds near the placement sites.
- Select appropriate electrodes: Use small (2x2 cm) or medium (5x5 cm) electrodes for better control around the facial contours.
- Electrode positioning:
Option 1 - General pain relief:
Electrode 1: Place it on the upper temple area (above the eyebrow on the affected side).
Electrode 2: Position it just in front of the ear on the masseter muscle (jaw muscle).
Option 2 - If pain radiates toward the jaw or temple:
Electrode 1: Place it on the upper cheekbone, at least 2 cm away from the fracture site.
Electrode 2: Position it near the temporomandibular joint (TMJ), just above the jawline. - Set the TENS device:
Mode: Conventional TENS
Frequency: 80-100 Hz (high-frequency for acute pain)
Pulse width: 50-150 µs
Intensity: Adjust to a comfortable tingling sensation, without muscle contraction
Duration: 20-30 minutes, 2-3 times per day
Monitor the response: Adjust intensity if discomfort arises and discontinue if irritation occurs. - Important: Avoid placing electrodes directly over the fractured cheekbone, as excessive stimulation may cause discomfort and interfere with the healing process.
Migraine
Migraine is a neurological condition characterized by recurrent, intense headaches that can last from a few hours to several days. It is often accompanied by nausea, visual disturbances, and sensitivity to light and sound. Migraines are believed to result from abnormal brain activity affecting nerve signals, blood vessels, and neurotransmitters.
- Prepare the skin: Ensure the skin is clean and dry before electrode placement to improve conductivity and adhesion.
- Select appropriate electrodes: Use small (2x2 cm) or medium (5x5 cm) electrodes to ensure precise nerve stimulation.
- Electrode positioning:
Option 1 - Trigeminal nerve stimulation (recommended for frontal migraines):
Electrode 1: Place it centrally on the forehead, above the eyebrows to target the trigeminal nerve.
Electrode 2: Position it on one temple (affected side) to enhance pain modulation.
Option 2 - Occipital nerve stimulation (recommended for migraines with neck tension or occipital pain):
Electrode 1: Place it at the base of the skull, just above the hairline, on the affected side.
Electrode 2: Position it on the upper neck, about 3-5 cm below the first electrode along the cervical spine. - Set the TENS device:
Mode: Burst or Modulated TENS (for chronic migraines) / Conventional TENS (for acute pain relief)
Frequency: 2-4 Hz (low-frequency for long-term pain modulation) / 80-100 Hz (high-frequency for immediate relief)
Pulse width: 150-250 µs (for deeper nerve stimulation)
Intensity: Adjust to a gentle tingling sensation, avoiding discomfort or muscle contraction.
Duration: 20-40 minutes, 1-2 times per day depending on symptom severity.
Monitor the response: If discomfort occurs or migraine worsens, discontinue use and adjust placement or parameters. - Important: Avoid placing electrodes directly on the temples or near the eyes, as excessive stimulation in these areas may trigger increased sensitivity or worsen migraine symptoms.
Septal Fracture
Septal fracture refers to a break in the nasal septum, the thin wall of cartilage and bone that separates the nostrils. This type of fracture often results from direct trauma to the nose, such as sports injuries, falls, or accidents. Symptoms typically include nasal pain, swelling, bruising, difficulty breathing, and in some cases, nosebleeds or a deviated septum.
- Prepare the skin: Clean and dry the treatment area before placing the electrodes to improve adhesion and conductivity.
- Select appropriate electrodes: Use small (2x2 cm) electrodes to precisely target the surrounding nerve areas without applying pressure on the nose.
- Electrode positioning:
Option 1 - Pain relief using facial nerve stimulation (recommended for pain near the nose and eyes):
Electrode 1: Place it below the eye, on the upper cheekbone, on the side of the fracture.
Electrode 2: Position it on the forehead, above the eyebrow, on the same side as the injury.
Option 2 - Additional pain relief via the jaw and temple (for discomfort radiating from the nose to the cheek or head):
Electrode 1: Place it on the upper cheek, lateral to the nose, avoiding direct contact with the nasal bridge.
Electrode 2: Position it on the temple, on the same side as the fracture. - Set the TENS device:
Mode: Conventional TENS (for immediate pain relief) or Burst TENS (for longer-lasting pain control)
Frequency: 80-100 Hz (high-frequency for acute pain relief) or 2-4 Hz (low-frequency for prolonged pain control)
Pulse width: 100-200 µs for effective nerve stimulation
Intensity: Start with a low intensity and gradually increase until you feel a gentle tingling sensation. Avoid excessive stimulation or muscle contraction.
Duration: 20-30 minutes, 2-3 times per day, depending on pain severity.
Monitor the response: If irritation, discomfort, or worsening symptoms occur, stop the session and adjust electrode placement or intensity. - Important: Do not place electrodes directly on the nose or over the fractured area.
Frozen Shoulder
Frozen shoulder (adhesive capsulitis) is a condition that causes persistent stiffness, pain, and restricted movement in the shoulder joint. It develops gradually, often without an obvious cause, and progresses through three stages: freezing (increasing pain and stiffness), frozen (severe limitation in movement), and thawing (gradual improvement in mobility). This condition is more common in individuals over 40 and those recovering from injuries or surgeries that have led to prolonged shoulder immobility.
- Prepare the skin: Clean and dry the shoulder area to ensure the electrodes adhere properly.
- Select appropriate electrodes: Use medium (5x5 cm) or large (5x9 cm) electrodes to cover a broader area and maximize pain relief.
- Electrode positioning:
Option 1 - General pain relief (for moderate to severe discomfort):
Electrode 1: Place it on the upper back, just above the affected shoulder blade.
Electrode 2: Position it on the front of the shoulder, near the deltoid muscle.
Option 2 - Targeting deep shoulder pain (for cases where pain radiates down the arm):
Electrode 1: Place it on the top of the shoulder, close to the trapezius muscle.
Electrode 2: Position it on the outer part of the upper arm, near the deltoid insertion. - Set the TENS device:
Mode: Conventional TENS (for ongoing pain relief) or Modulated TENS (for varying stimulation)
Frequency: 50-100 Hz (for pain relief) or 2-4 Hz (for deep muscle relaxation)
Pulse width: 150-250 µs for effective nerve activation
Intensity: Increase gradually to a strong but comfortable tingling sensation, avoiding muscle contraction.
Duration: 30-40 minutes, 2-3 times per day.
Monitor the response: If discomfort increases, adjust electrode placement or intensity. - Important: Avoid placing electrodes directly over the shoulder joint capsule, as excessive stimulation may cause irritation.
Rotator Cuff Tendinitis
Rotator cuff tendinitis is an inflammatory condition affecting the tendons of the rotator cuff, a group of muscles responsible for shoulder stability and movement. It typically develops due to repetitive overhead activities, poor posture, or shoulder overuse in sports and daily tasks. Symptoms include shoulder pain, weakness, and discomfort when lifting or rotating the arm.
- Prepare the skin: Clean and dry the shoulder area before applying the electrodes to enhance adhesion and conductivity.
- Select appropriate electrodes: Use medium (5x5 cm) or large (5x9 cm) electrodes for broader coverage and pain relief.
- Electrode positioning:
Option 1 - General pain relief (for localized shoulder discomfort):
Electrode 1: Place it on the top of the shoulder, over the supraspinatus tendon.
Electrode 2: Position it on the upper back, just above the shoulder blade.
Option 2 - Targeting deeper pain and inflammation (for cases with radiating discomfort):
Electrode 1: Place it on the front of the shoulder, near the deltoid insertion.
Electrode 2: Position it on the lateral side of the upper arm, along the biceps muscle. - Set the TENS device:
Mode: Conventional TENS (for ongoing pain relief) or Burst TENS (for deep pain modulation)
Frequency: 80-100 Hz (for acute pain relief) or 2-4 Hz (for prolonged pain control)
Pulse width: 150-250 µs for effective nerve stimulation
Intensity: Adjust to a strong but comfortable tingling sensation, avoiding muscle contraction.
Duration: 20-30 minutes, 2-3 times per day.
Monitor the response: If discomfort or increased irritation occurs, adjust electrode placement or intensity. - Important: Avoid placing electrodes directly over the rotator cuff tendons, as stimulation may be less effective and could cause discomfort in inflamed tissue.
Tennis Elbow
Tennis elbow (lateral epicondylitis) is a condition caused by overuse of the forearm muscles, leading to inflammation and microtears in the tendons that attach to the lateral epicondyle of the elbow. It commonly affects individuals who perform repetitive wrist and forearm movements, such as tennis players, manual laborers, and office workers using a mouse and keyboard. Symptoms include pain on the outer part of the elbow, weakness in grip strength, and discomfort when lifting or extending the wrist.
- Prepare the skin: Clean and dry the forearm and elbow area to improve electrode adhesion and conductivity.
- Select appropriate electrodes: Use small (2x2 cm) or medium (5x5 cm) electrodes to ensure precise placement over the affected area.
- Electrode positioning:
Option 1 - Direct pain relief (for localized elbow discomfort):
Electrode 1: Place it directly over the lateral epicondyle (outer part of the elbow joint).
Electrode 2: Position it a few centimeters below, along the forearm extensor muscles.
Option 2 - Broader pain modulation (for pain extending down the forearm):
Electrode 1: Place it just above the elbow joint, on the outer part of the arm.
Electrode 2: Position it further down the forearm, along the extensor muscle group. - Set the TENS device:
Mode: Conventional TENS (for immediate pain relief) or Modulated TENS (for sustained pain management)
Frequency: 80-100 Hz (for acute pain relief) or 2-4 Hz (for prolonged pain control)
Pulse width: 150-250 µs for effective nerve stimulation
Intensity: Adjust to a comfortable tingling sensation, avoiding muscle contraction.
Duration: 20-30 minutes, 2-3 times per day.
Monitor the response: If discomfort or irritation occurs, adjust electrode placement or intensity. - Important: Avoid placing electrodes directly over inflamed tendons for extended periods, as prolonged stimulation may increase sensitivity.
Golfer's Elbow
Golfer’s elbow (medial epicondylitis) is a condition characterized by pain and inflammation in the tendons that connect the forearm muscles to the medial epicondyle of the elbow. It is caused by repetitive wrist flexion and forearm pronation, commonly seen in golfers, weightlifters, and individuals who perform gripping tasks frequently. Symptoms include pain on the inner side of the elbow, weakness in grip strength, and discomfort when flexing the wrist or rotating the forearm.
- Prepare the skin: Clean and dry the inner elbow and forearm to ensure proper electrode adhesion.
- Select appropriate electrodes: Use small (2x2 cm) or medium (5x5 cm) electrodes for targeted pain relief.
- Electrode positioning:
Option 1 - Direct pain relief (for localized discomfort at the inner elbow):
Electrode 1: Place it directly over the medial epicondyle (inner side of the elbow).
Electrode 2: Position it a few centimeters below, along the forearm flexor muscles.
Option 2 - Broader pain modulation (for pain extending down the forearm):
Electrode 1: Place it just above the inner elbow.
Electrode 2: Position it further down the forearm, along the flexor-pronator muscle group. - Set the TENS device:
Mode: Conventional TENS (for immediate pain relief) or Burst TENS (for deeper pain modulation)
Frequency: 80-100 Hz (for acute pain relief) or 2-4 Hz (for long-term pain management)
Pulse width: 150-250 µs for effective nerve stimulation
Intensity: Adjust to a comfortable tingling sensation, avoiding muscle contraction.
Duration: 20-30 minutes, 2-3 times per day.
Monitor the response: If discomfort or irritation occurs, adjust electrode placement or intensity. - Important: Avoid placing electrodes directly over inflamed tendons for extended periods, as prolonged stimulation may increase sensitivity.
Wrist Tendinitis
Wrist tendinitis is an inflammatory condition affecting the tendons in the wrist due to repetitive movements, excessive strain, or poor ergonomics. It commonly affects individuals who perform frequent gripping, typing, or lifting motions, such as office workers, athletes, and manual laborers. Symptoms include pain, swelling, stiffness, and discomfort when flexing or extending the wrist, sometimes radiating into the hand or forearm.
- Prepare the skin: Clean and dry the wrist and forearm area to ensure proper electrode adhesion and conductivity.
- Select appropriate electrodes: Use small (2x2 cm) electrodes for precise placement, avoiding excessive stimulation of the sensitive wrist tendons.
- Electrode positioning:
Option 1 - Direct pain relief (for localized wrist discomfort):
Electrode 1: Place it on the top of the wrist, just above the area of pain.
Electrode 2: Position it on the underside of the wrist, aligning with the first electrode to create a pain-blocking pathway.
Option 2 - Broader pain modulation (for pain extending into the forearm or hand):
Electrode 1: Place it on the forearm, about 5 cm above the wrist, targeting the flexor or extensor muscle group.
Electrode 2: Position it on the hand, near the base of the thumb (for radial-side pain) or near the pinky (for ulnar-side pain). - Set the TENS device:
Mode: Conventional TENS (for immediate pain relief) or Modulated TENS (for varying intensity to prevent adaptation)
Frequency: 80-100 Hz (for acute pain relief) or 2-4 Hz (for long-term pain management)
Pulse width: 150-250 µs for effective nerve stimulation
Intensity: Start with a low intensity and gradually increase until a comfortable tingling sensation is felt. Avoid excessive stimulation that may cause discomfort.
Duration: 20-30 minutes, 2-3 times per day.
Monitor the response: If discomfort, increased sensitivity, or unusual sensations occur, adjust electrode placement or reduce intensity. - Important: Avoid placing electrodes directly over the carpal tunnel area, as excessive stimulation may worsen nerve compression symptoms.
Carpal Tunnel Syndrome
Carpal tunnel syndrome (CTS) is a condition caused by compression of the median nerve as it passes through the carpal tunnel in the wrist. It commonly develops due to repetitive hand movements, prolonged wrist flexion, or inflammatory conditions that increase pressure on the nerve. Symptoms include numbness, tingling, weakness, and pain in the hand and fingers, often worsening at night or during activities involving gripping or typing.
- Prepare the skin: Clean and dry the wrist and forearm area to ensure proper electrode adhesion and conductivity.
- Select appropriate electrodes: Use small (2x2 cm) electrodes for precise placement, avoiding direct compression over the carpal tunnel.
- Electrode positioning:
Option 1 - Pain relief with median nerve stimulation (recommended for mild to moderate CTS):
Electrode 1: Place it on the palm side of the forearm, about 5 cm above the wrist crease.
Electrode 2: Position it on the back of the wrist, aligned with the first electrode.
Option 2 - Broader pain modulation (for persistent symptoms extending into the hand or forearm):
Electrode 1: Place it on the forearm, about 7-10 cm above the wrist, targeting the flexor muscle group.
Electrode 2: Position it on the hand, near the base of the thumb (thenar eminence) to stimulate the affected nerve pathway. - Set the TENS device:
Mode: Conventional TENS (for pain relief) or Modulated TENS (for varying intensity)
Frequency: 50-100 Hz (for acute pain relief) or 2-10 Hz (for chronic pain and nerve stimulation)
Pulse width: 200-250 µs for optimal nerve activation
Intensity: Adjust to a comfortable tingling sensation, ensuring no strong muscle contractions.
Duration: 20-30 minutes, 2-3 times per day.
Monitor the response: If symptoms worsen, such as increased numbness or tingling, reduce intensity or adjust electrode placement. - Important: Avoid placing electrodes directly over the carpal tunnel, as excessive stimulation may increase nerve compression symptoms.
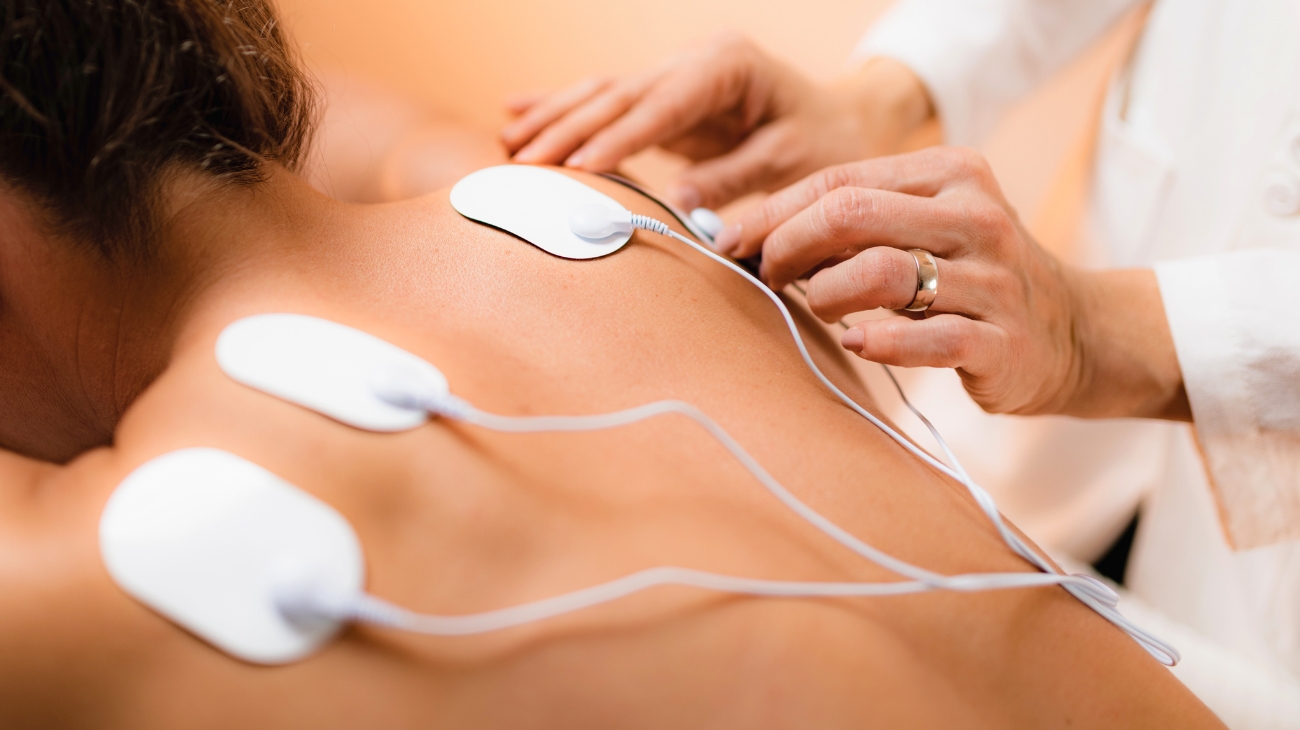
TENS Electrode Placement for Core and Back
The core and back have the highest concentration of nerves in the body and are also among the most important areas, as they contain all vital organs. For this reason, special care must be taken when placing the electrodes. The correct way to do this, to avoid injury, is to follow the instructions shown in the following images.
Abdominal Muscle Strain
Abdominal muscle strain is an injury that occurs when the muscle fibers in the abdominal region are overstretched or torn due to excessive force, sudden movements, or repetitive strain. This condition is common in athletes, weightlifters, and individuals performing activities that require intense core engagement. Symptoms include localized pain, muscle stiffness, swelling, and discomfort during movements such as bending, twisting, or coughing.
- Prepare the skin: Clean and dry the abdominal area before applying the electrodes to enhance adhesion and conductivity.
- Select appropriate electrodes: Use medium (5x5 cm) or large (5x9 cm) electrodes to cover a broader area for effective pain relief.
- Electrode positioning:
Option 1 - Localized pain relief (for pain centered in a specific area):
Electrode 1: Place it on the side of the injured muscle, avoiding direct placement over the strain.
Electrode 2: Position it on the opposite side of the affected area, creating a lateral stimulation pattern.
Option 2 - Cross-pattern pain relief (for wider discomfort and tension):
Electrode 1: Place it on the upper part of the abdominal muscle, above the strain.
Electrode 2: Position it on the lower part of the affected muscle, below the strain, forming a vertical placement. - Set the TENS device:
Mode: Conventional TENS (for immediate pain relief) or Burst TENS (for muscle relaxation and recovery)
Frequency: 80-100 Hz (for pain relief) or 2-4 Hz (for deep muscle relaxation)
Pulse width: 200-250 µs for effective nerve stimulation
Intensity: Adjust to a gentle tingling sensation, avoiding muscle contraction.
Duration: 20-30 minutes, 2-3 times per day.
Monitor the response: If discomfort increases, adjust electrode placement or reduce intensity. - Important: Avoid placing electrodes directly over the navel or lower abdomen, as excessive stimulation in these areas may cause discomfort or affect sensitive tissues.
Lower Back Pain
Lower back pain is a common condition affecting the lumbar region, often caused by muscle strain, poor posture, prolonged sitting, or underlying issues such as herniated discs or degenerative changes. It can present as a dull, aching discomfort or sharp, shooting pain that worsens with movement. Lower back pain can also radiate to the hips or legs, particularly if nerve compression is involved.
- Prepare the skin: Clean and dry the lower back area to ensure proper electrode adhesion and conductivity.
- Select appropriate electrodes: Use medium (5x5 cm) or large (5x9 cm) electrodes to effectively cover the lumbar region.
- Electrode positioning:
Option 1 - General pain relief (for widespread lower back discomfort):
Electrode 1: Place it on the left side of the lower back, just above the painful area.
Electrode 2: Position it on the right side of the lower back, mirroring the first electrode to create a balanced pain-relief effect.
Option 2 - Targeting deep muscle pain (for localized lumbar strain):
Electrode 1: Place it on the left lower back, near the lumbar paraspinal muscles.
Electrode 2: Position it below the first electrode, closer to the sacral region, to create a vertical placement. - Set the TENS device:
Mode: Conventional TENS (for ongoing pain relief) or Burst TENS (for deeper muscle relaxation)
Frequency: 80-100 Hz (for acute pain relief) or 2-4 Hz (for deep muscle stimulation)
Pulse width: 200-250 µs for effective nerve stimulation
Intensity: Adjust to a comfortable tingling sensation, avoiding excessive stimulation or muscle contraction.
Duration: 30-40 minutes, 2-3 times per day.
Monitor the response: If symptoms worsen or discomfort increases, adjust electrode placement or reduce intensity. - Important: Avoid placing electrodes directly over the spine, as excessive stimulation in this area may not be effective and could cause discomfort.
Upper Back Pain
Upper back pain is a common condition affecting the thoracic spine and surrounding muscles, often caused by poor posture, prolonged sitting, muscle strain, or stress-related tension. It can also result from repetitive movements or imbalances in the shoulder and neck regions. Symptoms include aching, stiffness, and discomfort between the shoulder blades or along the upper spine, sometimes radiating to the neck or arms.
- Prepare the skin: Clean and dry the upper back area before applying the electrodes. If there is significant hair, consider trimming it to improve electrode adhesion.
- Select appropriate electrodes: Use medium (5x5 cm) or large (5x9 cm) electrodes for better coverage of the thoracic region.
- Electrode positioning:
Option 1 - General pain relief (for widespread discomfort across the upper back):
Electrode 1: Place it on the left side of the upper back, just below the shoulder blade.
Electrode 2: Position it on the right side of the upper back, mirroring the first electrode for balanced stimulation.
Option 2 - Targeted pain relief (for localized tension or muscle knots):
Electrode 1: Place it on the affected muscle area, avoiding direct placement on the spine.
Electrode 2: Position it just above or below the first electrode, following the direction of the muscle fibers.
Option 3 - Radiating pain relief (for discomfort extending to the neck or arms):
Electrode 1: Place it near the base of the neck, along the trapezius muscle.
Electrode 2: Position it on the outer part of the upper arm, if pain radiates downward. - Set the TENS device:
Mode: Conventional TENS (for ongoing pain relief) or Burst TENS (for muscle relaxation and tension release)
Frequency: 80-100 Hz (for acute pain relief) or 2-4 Hz (for chronic pain and muscle relaxation)
Pulse width: 200-250 µs for effective nerve activation
Intensity: Adjust to a comfortable tingling sensation, avoiding excessive stimulation or muscle contraction.
Duration: 30-40 minutes, 2-3 times per day.
Monitor the response: If discomfort increases or new symptoms appear, adjust electrode placement or reduce intensity. - Important: Avoid placing electrodes directly over the spine, as excessive stimulation in this area may not be effective and could cause discomfort.
Neck Pain
Neck pain is a widespread condition affecting the cervical spine and surrounding muscles, often caused by poor posture, prolonged screen time, muscle strain, or stress-related tension. It can also result from injuries such as whiplash, herniated discs, or degenerative cervical conditions. Symptoms include stiffness, aching, limited mobility, and in some cases, radiating pain to the shoulders, upper back, or arms.
- Prepare the skin: Clean and dry the neck and upper shoulder area to improve electrode adhesion. If there is significant hair, trimming the area can enhance conductivity.
- Select appropriate electrodes: Use small (2x2 cm) or medium (5x5 cm) electrodes for precise placement and controlled stimulation.
- Electrode positioning:
Option 1 - General neck pain relief (for widespread discomfort in the cervical area):
Electrode 1: Place it on the left side of the neck, just below the hairline.
Electrode 2: Position it on the right side of the neck, mirroring the first electrode for balanced stimulation.
Option 2 - Targeted muscle relaxation (for localized tension and stiffness in the trapezius muscles):
Electrode 1: Place it at the base of the neck, near the upper trapezius muscle.
Electrode 2: Position it on the upper back, between the shoulder blades.
Option 3 - Radiating pain relief (for discomfort extending to the shoulders or arms):
Electrode 1: Place it on the side of the neck, near the sternocleidomastoid muscle.
Electrode 2: Position it on the upper part of the arm or shoulder, following the pain pathway. - Set the TENS device:
Mode: Conventional TENS (for ongoing pain relief) or Modulated TENS (for varying stimulation intensity)
Frequency: 80-100 Hz (for acute pain relief) or 2-4 Hz (for chronic muscle tension)
Pulse width: 200-250 µs for effective nerve activation
Intensity: Adjust to a comfortable tingling sensation, avoiding strong muscle contractions.
Duration: 20-30 minutes, 2-3 times per day.
Monitor the response: If discomfort worsens, adjust electrode placement or lower intensity. - Important: Avoid placing electrodes directly on the throat or over the spinal column, as this may cause discomfort or unintended nerve stimulation.
Herniated Disc
Herniated disc occurs when the soft inner portion of an intervertebral disc pushes through the outer layer, potentially compressing nearby nerves. This condition is most common in the lumbar and cervical spine, often resulting from aging, repetitive strain, or improper lifting techniques. Symptoms vary depending on the location and severity but may include sharp or radiating pain, numbness, tingling, muscle weakness, and limited mobility.
- Prepare the skin: Clean and dry the treatment area to improve electrode adhesion. If there is significant hair, trimming the area may enhance conductivity.
- Select appropriate electrodes: Use medium (5x5 cm) or large (5x9 cm) electrodes for broader coverage of the affected spinal region.
- Electrode positioning:
Option 1 - Lumbar herniated disc (for pain in the lower back and legs):
Electrode 1: Place it on the left side of the lower back, near the painful area but not directly over the spine.
Electrode 2: Position it on the right side, mirroring the first electrode to create a balanced stimulation field.
Option 2 - Cervical herniated disc (for pain in the neck and arms):
Electrode 1: Place it on the upper back, near the base of the neck, avoiding direct placement on the cervical spine.
Electrode 2: Position it on the shoulder or upper arm if pain radiates into the arm.
Option 3 - Sciatic nerve pain relief (for pain radiating down the leg):
Electrode 1: Place it on the lower back, near the affected nerve root.
Electrode 2: Position it on the back of the thigh or calf to follow the sciatic nerve pathway. - Set the TENS device:
Mode: Conventional TENS (for ongoing pain relief) or Burst TENS (for deep nerve stimulation)
Frequency: 80-120 Hz (for acute nerve pain) or 2-4 Hz (for chronic pain management)
Pulse width: 200-300 µs for effective nerve activation
Intensity: Adjust to a strong but comfortable tingling sensation, avoiding excessive stimulation.
Duration: 30-45 minutes, 2-3 times per day.
Monitor the response: If pain worsens, adjust electrode placement or reduce intensity. - Important: Avoid placing electrodes directly over the spine, as excessive stimulation in this area may not be effective and could cause discomfort.
Chest Muscle Strain
Chest muscle strain occurs when the muscle fibers in the pectoral region are overstretched or torn due to sudden force, excessive weightlifting, or repetitive movements. This condition is common in athletes, bodybuilders, and individuals engaging in activities that require pushing or pulling motions. Symptoms include localized pain, swelling, tenderness, and discomfort when moving the arms or taking deep breaths.
- Prepare the skin: Clean and dry the chest area before applying electrodes to ensure optimal adhesion and conductivity.
- Select appropriate electrodes: Use medium (5x5 cm) or large (5x9 cm) electrodes for effective coverage of the affected muscle.
- Electrode positioning:
Option 1 - Localized pain relief (for direct muscle strain):
Electrode 1: Place it above the injured area, avoiding direct placement over the sternum.
Electrode 2: Position it below or to the side of the strained muscle, following the direction of the muscle fibers.
Option 2 - Broad pain relief (for muscle strain affecting a larger area):
Electrode 1: Place it on the upper part of the pectoral muscle, near the collarbone.
Electrode 2: Position it on the outer part of the chest, near the shoulder. - Set the TENS device:
Mode: Conventional TENS (for pain relief) or Burst TENS (for deep muscle relaxation)
Frequency: 80-100 Hz (for acute pain relief) or 2-4 Hz (for muscle recovery)
Pulse width: 200-250 µs for effective nerve stimulation
Intensity: Adjust to a comfortable tingling sensation, avoiding excessive stimulation or muscle contraction.
Duration: 20-30 minutes, 2-3 times per day.
Monitor the response: If discomfort increases, adjust electrode placement or lower intensity. - Important: Avoid placing electrodes directly over the heart, sternum, or near the armpits, as these areas contain sensitive nerves and cardiovascular structures.
Whiplash
Whiplash on the neck is a soft tissue injury that occurs when the neck is forcefully jerked backward and forward, commonly due to car accidents, sports collisions, or sudden impacts. This rapid motion can strain or tear muscles, ligaments, and tendons in the cervical spine. Symptoms include neck pain, stiffness, headaches, dizziness, and in some cases, radiating discomfort to the shoulders and upper back.
- Prepare the skin: Clean and dry the neck and upper back to ensure proper electrode adhesion. If there is significant hair, trimming may improve conductivity.
- Select appropriate electrodes: Use small (2x2 cm) or medium (5x5 cm) electrodes to allow for precise placement on the neck and surrounding muscles.
- Electrode positioning:
Option 1 - General neck pain relief (for widespread discomfort in the cervical region):
Electrode 1: Place it on the left side of the neck, just below the hairline.
Electrode 2: Position it on the right side of the neck, mirroring the first electrode.
Option 2 - Upper back and shoulder relief (for muscle tightness extending beyond the neck):
Electrode 1: Place it at the base of the neck, near the upper trapezius muscle.
Electrode 2: Position it on the upper back, between the shoulder blades.
Option 3 - Radiating pain relief (for discomfort extending to the shoulders or arms):
Electrode 1: Place it on the side of the neck, near the sternocleidomastoid muscle.
Electrode 2: Position it on the upper part of the arm or shoulder, following the pain pathway. - Set the TENS device:
Mode: Conventional TENS (for ongoing pain relief) or Modulated TENS (to prevent adaptation to the stimulation)
Frequency: 80-100 Hz (for acute pain relief) or 2-4 Hz (for chronic muscle tension)
Pulse width: 200-250 µs for effective nerve activation
Intensity: Adjust to a comfortable tingling sensation, avoiding strong muscle contractions.
Duration: 20-30 minutes, 2-3 times per day.
Monitor the response: If discomfort worsens, adjust electrode placement or lower intensity. - Important: Avoid placing electrodes directly on the throat or over the cervical spine, as this may cause discomfort or unintended nerve stimulation.
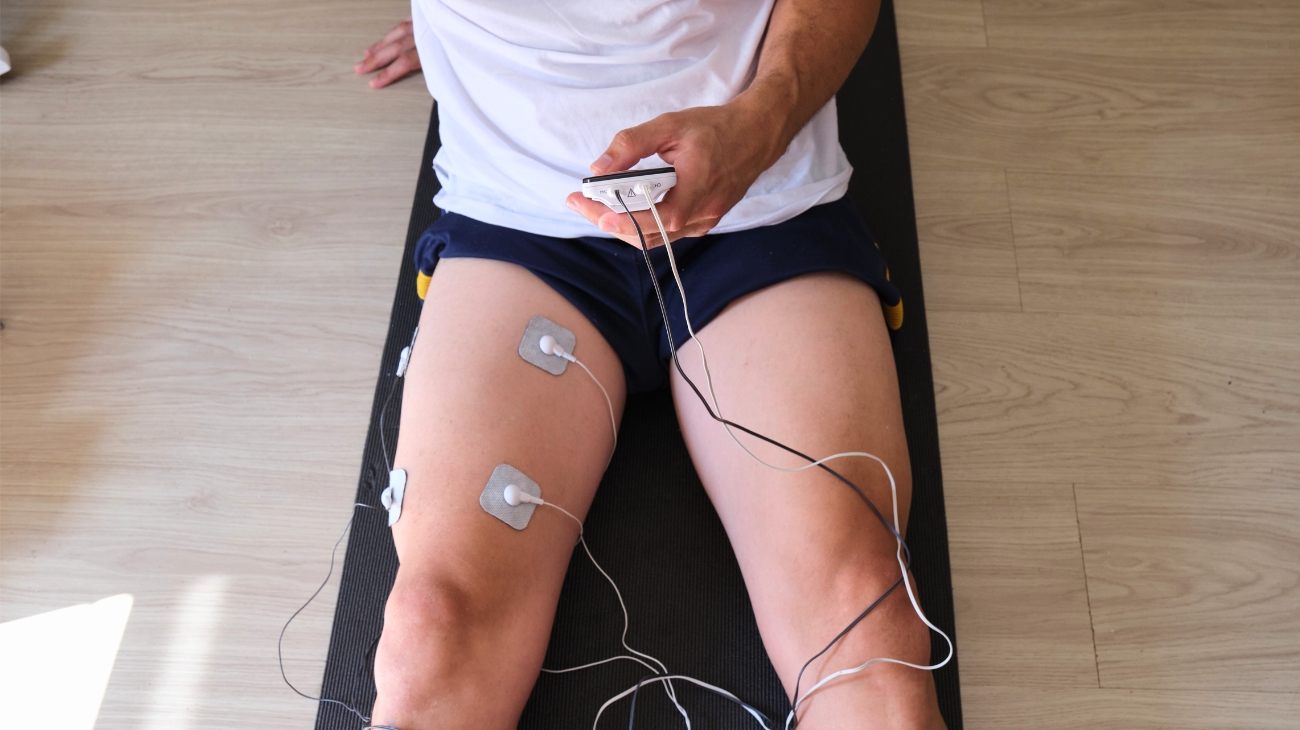
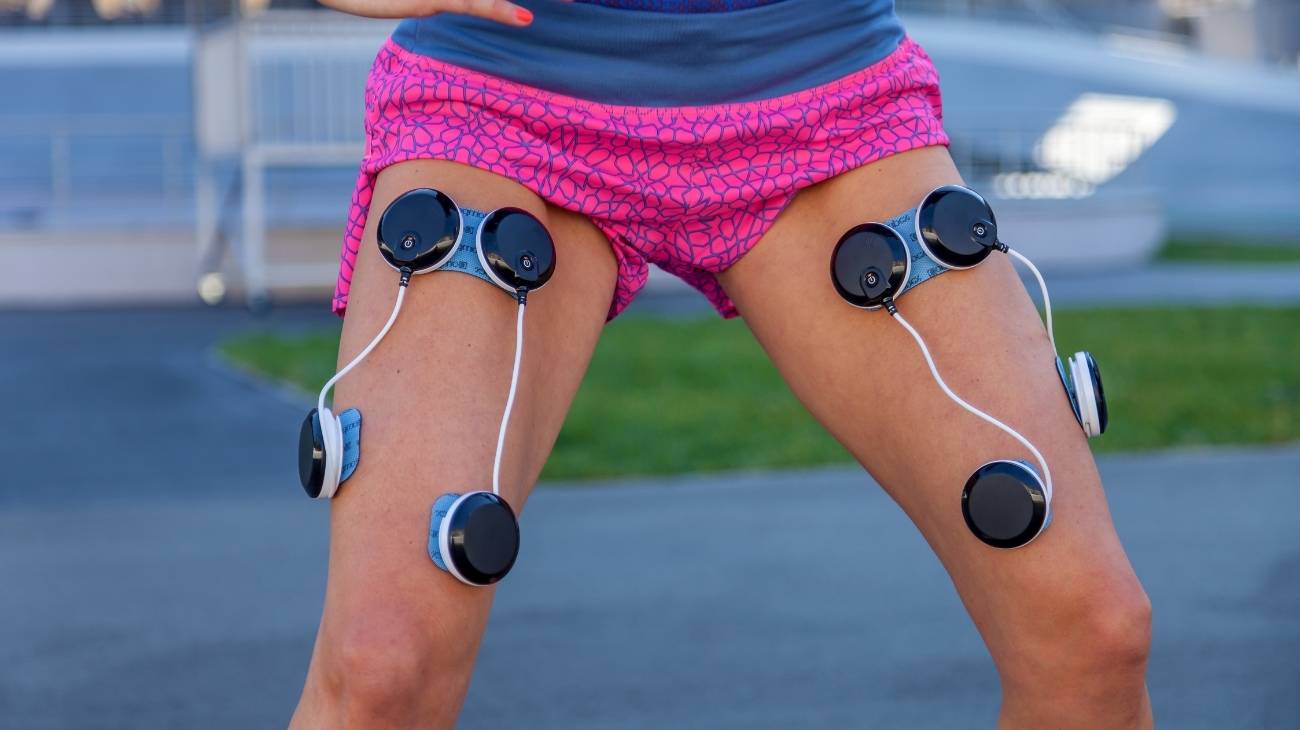
TENS Electrode Placement for Lower Body
The lower body is one of the most complex areas due to its dense muscle groups, such as the thighs, and the vast network of nerve branches, including the femoral and tibial nerves. Below, you will learn how to position TENS electrodes in this area.
Achilles Tendinitis
Achilles tendinitis is an overuse injury that causes inflammation and irritation of the Achilles tendon, which connects the calf muscles to the heel bone. It commonly affects runners, athletes, and individuals who engage in repetitive jumping or sudden increases in physical activity. Symptoms include pain and stiffness along the back of the ankle, swelling, tenderness, and discomfort that worsens with movement.
- Prepare the skin: Clean and dry the treatment area to improve electrode adhesion. If necessary, trim excess hair for better conductivity.
- Select appropriate electrodes: Use small (2x2 cm) or medium (5x5 cm) electrodes to allow precise placement around the Achilles tendon without direct contact.
- Electrode positioning:
Option 1 - General pain relief (for mild to moderate Achilles tendinitis):
Electrode 1: Place it on the upper part of the calf, a few centimeters above the Achilles tendon.
Electrode 2: Position it on the lower calf muscle, avoiding direct placement on the tendon itself.
Option 2 - Broader pain relief (for pain extending to the lower leg and foot):
Electrode 1: Place it on the lateral side of the calf, near the gastrocnemius muscle.
Electrode 2: Position it on the sole of the foot, near the heel, to stimulate nerve pathways related to the Achilles region.
Option 3 - Severe or chronic pain (for long-term Achilles tendinitis with inflammation and stiffness):
Electrode 1: Place it on the lower hamstring, just above the knee.
Electrode 2: Position it on the calf, midway between the knee and Achilles tendon, avoiding direct pressure on the tendon itself. - Set the TENS device:
Mode: Conventional TENS (for immediate pain relief) or Modulated TENS (for long-term pain management)
Frequency: 80-120 Hz (for acute pain relief) or 2-4 Hz (for chronic pain and healing)
Pulse width: 200-300 µs for effective nerve stimulation
Intensity: Adjust to a gentle tingling sensation, avoiding any strong muscle contractions.
Duration: 20-30 minutes, 2-3 times per day.
Monitor the response: If discomfort increases, adjust electrode placement or reduce intensity. - Important: Avoid placing electrodes directly over the Achilles tendon, as excessive stimulation may cause irritation or discomfort. In cases of severe inflammation, consult a healthcare professional before using TENS.
Tarsal Tunnel Syndrome
Tarsal tunnel syndrome is a condition caused by compression of the posterior tibial nerve as it passes through the tarsal tunnel, located on the inner side of the ankle. This compression can result from repetitive stress, inflammation, flat feet, or trauma. Symptoms include burning pain, tingling, numbness, and weakness in the foot and ankle, often worsening with prolonged standing or walking.
- Prepare the skin: Clean and dry the inner ankle and foot to enhance electrode adhesion. Trim excess hair if necessary for better conductivity.
- Select appropriate electrodes: Use small (2x2 cm) or medium (5x5 cm) electrodes to allow precise placement around the affected nerve pathway.
- Electrode positioning:
Option 1 - Localized pain relief (for tingling, burning, or numbness around the ankle):
Electrode 1: Place it just above the inner ankle, over the tibial nerve pathway but avoiding direct placement on the tarsal tunnel.
Electrode 2: Position it slightly lower, near the arch of the foot, following the nerve distribution.
Option 2 - Broad pain modulation (for symptoms radiating into the sole of the foot):
Electrode 1: Place it on the inner calf, a few centimeters above the ankle, to stimulate the nerve upstream.
Electrode 2: Position it on the bottom of the foot, near the ball of the foot, to influence nerve conduction along its pathway.
Option 3 - Chronic pain relief (for long-term cases with persistent discomfort and weakness):
Electrode 1: Place it on the lower calf, near the Achilles tendon but not directly on it.
Electrode 2: Position it on the arch of the foot or near the heel to influence deep nerve activity. - Set the TENS device:
Mode: Conventional TENS (for immediate pain relief) or Burst TENS (for long-term nerve modulation)
Frequency: 80-120 Hz (for acute nerve pain) or 2-4 Hz (for chronic neuropathic pain)
Pulse width: 200-300 µs for effective nerve activation
Intensity: Adjust to a mild tingling sensation, avoiding excessive stimulation that may worsen nerve sensitivity.
Duration: 20-30 minutes, 2-3 times per day.
Monitor the response: If symptoms worsen, stop the session and adjust electrode placement or intensity. - Important: Avoid placing electrodes directly over the tarsal tunnel, as excessive stimulation may aggravate nerve compression and increase symptoms.
Plantar Fasciitis
Plantar fasciitis is one of the most common causes of heel pain, resulting from inflammation of the plantar fascia, a thick band of connective tissue that runs along the bottom of the foot. It is often caused by excessive strain, prolonged standing, high-impact activities, or poor foot mechanics. Symptoms include sharp pain near the heel, stiffness in the arch, and discomfort that worsens in the morning or after long periods of inactivity.
- Prepare the skin: Clean and dry the sole of the foot and calf area before applying the electrodes. Trim excess hair if necessary to improve adhesion.
- Select appropriate electrodes: Use small (2x2 cm) or medium (5x5 cm) electrodes for targeted stimulation along the plantar fascia and calf muscles.
- Electrode positioning:
Option 1 - Localized pain relief (for sharp pain under the heel and arch):
Electrode 1: Place it on the bottom of the foot, near the heel but not directly under the most painful spot.
Electrode 2: Position it closer to the mid-arch, following the direction of the plantar fascia.
Option 2 - Broad pain relief (for pain radiating up the leg or affecting a larger area):
Electrode 1: Place it on the inner side of the ankle, near the tibial nerve.
Electrode 2: Position it on the calf muscle, a few centimeters above the Achilles tendon, to improve circulation and muscle relaxation.
Option 3 - Chronic pain management (for long-term plantar fasciitis with stiffness and inflammation):
Electrode 1: Place it on the sole of the foot, near the ball of the foot.
Electrode 2: Position it on the calf muscle, just below the knee, to improve nerve signaling and reduce pain sensitivity. - Set the TENS device:
Mode: Conventional TENS (for immediate pain relief) or Burst TENS (for long-term relief and muscle relaxation)
Frequency: 80-120 Hz (for acute pain relief) or 2-4 Hz (for chronic stiffness)
Pulse width: 200-300 µs for effective nerve stimulation
Intensity: Adjust to a comfortable tingling sensation, avoiding excessive stimulation that could cause discomfort.
Duration: 20-30 minutes, 2-3 times per day.
Monitor the response: If discomfort increases, adjust electrode placement or reduce intensity. - Important: Avoid placing electrodes directly on areas of severe tenderness or inflammation, as excessive stimulation may worsen discomfort.
Knee Tendinitis and Bursitis
Knee tendinitis and bursitis are common causes of knee pain, often resulting from overuse, repetitive strain, or direct trauma. Knee tendinitis (also called patellar tendinitis or jumper’s knee) occurs when the patellar tendon becomes inflamed due to excessive stress, particularly in activities like running and jumping. Knee bursitis involves inflammation of the fluid-filled sacs (bursae) around the knee, leading to swelling, stiffness, and tenderness. Both conditions can cause pain during movement and limit knee flexibility.
- Prepare the skin: Clean and dry the knee and surrounding area to ensure proper electrode adhesion. If necessary, trim excess hair for better conductivity.
- Select appropriate electrodes: Use medium (5x5 cm) or large (5x9 cm) electrodes for broader coverage, depending on the affected area.
- Electrode positioning:
Option 1 - Pain relief for patellar tendinitis (jumper’s knee):
Electrode 1: Place it above the patellar tendon, on the lower part of the quadriceps muscle.
Electrode 2: Position it on the upper shin (tibial tuberosity), just below the knee cap, avoiding direct placement over the tendon itself.
Option 2 - Pain relief for knee bursitis (prepatellar or pes anserine bursitis):
Electrode 1: Place it on the inner or outer side of the knee, depending on the location of the inflamed bursa.
Electrode 2: Position it slightly above or below the painful area to create a cross-pattern stimulation.
Option 3 - Broad knee pain relief (for generalized knee discomfort and stiffness):
Electrode 1: Place it on the front of the thigh, near the quadriceps.
Electrode 2: Position it on the back of the knee or lower hamstring to promote muscle relaxation and blood flow. - Set the TENS device:
Mode: Conventional TENS (for immediate pain relief) or Burst TENS (for deep muscle relaxation)
Frequency: 80-120 Hz (for acute pain relief) or 2-4 Hz (for chronic pain and inflammation)
Pulse width: 200-300 µs for effective nerve stimulation
Intensity: Adjust to a comfortable tingling sensation, avoiding muscle contraction or excessive stimulation.
Duration: 20-30 minutes, 2-3 times per day.
Monitor the response: If discomfort increases or symptoms worsen, adjust electrode placement or reduce intensity. - Important: Avoid placing electrodes directly over the patellar tendon or swollen bursae, as excessive stimulation may increase inflammation and irritation.
Ankle Tendinitis and Bursitis
Ankle tendinitis and bursitis are common causes of ankle pain, typically resulting from overuse, repetitive strain, poor biomechanics, or direct trauma. Ankle tendinitis involves inflammation of the tendons around the ankle, such as the Achilles, peroneal, or posterior tibial tendons, leading to pain, stiffness, and swelling. Ankle bursitis occurs when the bursae (fluid-filled sacs that cushion the joints) become inflamed, causing localized swelling, tenderness, and discomfort when moving the foot.
- Prepare the skin: Clean and dry the ankle and surrounding area before applying electrodes. If necessary, trim excess hair for better adhesion and conductivity.
- Select appropriate electrodes: Use small (2x2 cm) or medium (5x5 cm) electrodes to ensure precise placement and avoid direct stimulation of inflamed areas.
- Electrode positioning:
Option 1 - Pain relief for peroneal or posterior tibial tendinitis:
Electrode 1: Place it just above the affected tendon, either on the outer ankle (for peroneal tendinitis) or inner ankle (for posterior tibial tendinitis).
Electrode 2: Position it a few centimeters higher, following the direction of the tendon without direct placement on the inflamed area.
Option 2 - Pain relief for Achilles tendinitis and retrocalcaneal bursitis:
Electrode 1: Place it on the lower calf, about 5 cm above the Achilles tendon insertion.
Electrode 2: Position it on the lateral side of the heel, near the Achilles attachment, avoiding direct contact with the inflamed area.
Option 3 - Pain relief for ankle bursitis (subtalar or medial malleolar bursitis):
Electrode 1: Place it on the inner or outer side of the ankle, depending on the location of the inflamed bursa.
Electrode 2: Position it slightly above or below the painful area to create a cross-pattern stimulation. - Set the TENS device:
Mode: Conventional TENS (for immediate pain relief) or Burst TENS (for chronic inflammation and muscle relaxation)
Frequency: 80-120 Hz (for acute pain relief) or 2-4 Hz (for chronic pain and swelling)
Pulse width: 200-300 µs for effective nerve stimulation
Intensity: Adjust to a comfortable tingling sensation, avoiding excessive stimulation that could increase irritation.
Duration: 20-30 minutes, 2-3 times per day.
Monitor the response: If symptoms worsen, adjust electrode placement or reduce intensity. - Important: Avoid placing electrodes directly over the inflamed tendon or bursa, as excessive stimulation may increase irritation and prolong recovery.
Iliotibial Band Syndrome
Iliotibial Band Syndrome (ITBS) is a common overuse injury affecting the lateral side of the knee and thigh, often seen in runners, cyclists, and athletes involved in repetitive leg movements. It occurs when the iliotibial (IT) band—a thick band of connective tissue running from the hip to the knee—becomes irritated due to excessive friction over the lateral femoral condyle. Symptoms include sharp or burning pain on the outer knee, stiffness, and discomfort that worsens with prolonged activity.
- Prepare the skin: Clean and dry the thigh and lateral knee area before applying the electrodes. If necessary, trim excess hair for better adhesion and conductivity.
- Select appropriate electrodes: Use medium (5x5 cm) or large (5x9 cm) electrodes to effectively cover the IT band without direct placement over the knee joint.
- Electrode positioning:
Option 1 - Pain relief at the lateral knee (for localized IT band pain near the knee):
Electrode 1: Place it just above the lateral knee, on the lower part of the IT band.
Electrode 2: Position it a few centimeters higher along the IT band, avoiding direct placement over the knee joint.
Option 2 - Broad pain relief (for IT band tightness along the thigh and knee):
Electrode 1: Place it on the upper thigh, near the hip, along the IT band.
Electrode 2: Position it on the lower lateral thigh, a few centimeters above the knee, following the IT band’s path.
Option 3 - Muscle relaxation and circulation boost (for stiffness and chronic tightness):
Electrode 1: Place it on the lateral hip, near the tensor fasciae latae (TFL) muscle.
Electrode 2: Position it on the lateral calf, just below the knee, to create a cross-stimulation pattern. - Set the TENS device:
Mode: Conventional TENS (for immediate pain relief) or Burst TENS (for deep tissue relaxation)
Frequency: 80-120 Hz (for acute pain relief) or 2-4 Hz (for chronic tightness)
Pulse width: 200-300 µs for effective nerve stimulation
Intensity: Adjust to a comfortable tingling sensation, avoiding excessive stimulation that could worsen sensitivity.
Duration: 20-30 minutes, 2-3 times per day.
Monitor the response: If symptoms worsen, adjust electrode placement or lower intensity. - Important: Avoid placing electrodes directly over the knee joint, as excessive stimulation may cause discomfort or irritation in the joint area.
Quadriceps Strain and Sprain
Quadriceps strain and sprain are common injuries affecting the front thigh muscles, typically resulting from sudden forceful contractions, overstretching, or inadequate warm-ups before physical activity. Quadriceps strain occurs when muscle fibers tear due to excessive stress, causing pain, swelling, and reduced mobility. Quadriceps sprain involves ligament damage in the thigh, leading to stiffness and discomfort, especially during knee flexion or explosive movements.
- Prepare the skin: Clean and dry the quadriceps area before applying electrodes. If necessary, trim excess hair to improve adhesion and conductivity.
- Select appropriate electrodes: Use medium (5x5 cm) or large (5x9 cm) electrodes for broad muscle coverage, avoiding direct placement over the injury site.
- Electrode positioning:
Option 1 - Acute strain or sprain (for pain relief without stimulating damaged fibers):
Electrode 1: Place it on the upper part of the quadriceps, near the hip flexor.
Electrode 2: Position it on the lower part of the quadriceps, a few centimeters above the knee, avoiding direct placement over the injured area.
Option 2 - Swelling or bruising (for post-injury inflammation control):
Electrode 1: Place it on the lateral side of the thigh, near the vastus lateralis muscle.
Electrode 2: Position it on the inner thigh, near the vastus medialis, to provide balanced stimulation and promote drainage.
Option 3 - Chronic strain or muscle tightness (for long-term recovery and mobility improvement):
Electrode 1: Place it on the rectus femoris muscle, in the middle of the thigh.
Electrode 2: Position it on the lower hamstring, just behind the knee, to create a cross-stimulation effect for pain relief and muscle relaxation. - Set the TENS device:
Mode: Conventional TENS (for immediate pain relief) or Burst TENS (for deep tissue relaxation)
Frequency: 80-120 Hz (for acute pain relief) or 2-4 Hz (for chronic muscle tightness)
Pulse width: 200-300 µs for effective nerve stimulation
Intensity: Adjust to a comfortable tingling sensation, avoiding muscle contractions, which may worsen strain.
Duration: 20-30 minutes, 2-3 times per day.
Monitor the response: If symptoms worsen, adjust electrode placement or reduce intensity. - Important: Avoid placing electrodes directly over severely strained muscles or ligaments, as excessive stimulation may aggravate inflammation and prolong recovery. In cases of complete muscle tear or severe swelling, consult a healthcare professional before using TENS.
Hamstring Strain and Sprain
Hamstring strain and sprain are common injuries affecting the back of the thigh, often occurring in sports that involve sprinting, sudden acceleration, or overstretching. Hamstring strain refers to muscle fiber tears caused by excessive tension, leading to sharp pain, swelling, bruising, and restricted movement. Hamstring sprain involves damage to the tendons or ligaments supporting the hamstring muscles, causing stiffness and discomfort, particularly when bending the knee or engaging in explosive movements.
- Prepare the skin: Clean and dry the hamstring area before applying electrodes. If necessary, trim excess hair to improve adhesion and conductivity.
- Select appropriate electrodes: Use medium (5x5 cm) or large (5x9 cm) electrodes for broader muscle coverage while avoiding direct placement over the most painful area.
- Electrode positioning:
Option 1 - Acute strain or sprain (for pain relief without overstimulating the injury):
Electrode 1: Place it on the upper part of the hamstring, near the gluteal fold.
Electrode 2: Position it on the lower hamstring, a few centimeters above the knee, avoiding direct placement over the injury site.
Option 2 - Widespread pain relief (for tightness and soreness throughout the hamstring):
Electrode 1: Place it on the lateral side of the hamstring, near the biceps femoris muscle.
Electrode 2: Position it on the medial hamstring, near the semimembranosus muscle, to provide balanced stimulation.
Option 3 - Chronic strain or long-term recovery (for muscle tightness and mobility restoration):
Electrode 1: Place it on the middle of the hamstring, following the muscle fiber direction.
Electrode 2: Position it on the lower part of the gluteal area to create a cross-stimulation effect for deep tissue relaxation. - Set the TENS device:
Mode: Conventional TENS (for immediate pain relief) or Burst TENS (for chronic pain and muscle relaxation)
Frequency: 80-120 Hz (for acute pain relief) or 2-4 Hz (for chronic stiffness and muscle healing)
Pulse width: 200-300 µs for effective nerve stimulation
Intensity: Adjust to a comfortable tingling sensation, avoiding strong muscle contractions that could aggravate the injury.
Duration: 20-30 minutes, 2-3 times per day.
Monitor the response: If discomfort increases, adjust electrode placement or lower intensity. - Important: Avoid placing electrodes directly over a severely strained muscle or a swollen area, as excessive stimulation may increase inflammation and delay healing. In cases of complete muscle tear, consult a healthcare professional before using TENS.
Calf Muscle Strain and Sprain
Calf muscle strain and sprain are common injuries affecting the lower leg, typically occurring due to sudden acceleration, overstretching, or improper warm-up before physical activity. Calf muscle strain involves microscopic tears in the gastrocnemius or soleus muscles, leading to sharp pain, swelling, and difficulty walking. Calf muscle sprain refers to ligament damage in the lower leg, resulting in stiffness, tenderness, and discomfort, particularly when pushing off or flexing the foot.
- Prepare the skin: Clean and dry the calf area before applying electrodes. Trim excess hair if necessary to improve electrode adhesion and conductivity.
- Select appropriate electrodes: Use medium (5x5 cm) or large (5x9 cm) electrodes for broad coverage, ensuring stimulation is applied to surrounding muscle areas rather than directly over the injury.
- Electrode positioning:
Option 1 - Acute strain or sprain (for pain relief while avoiding overstimulation of injured tissue):
Electrode 1: Place it on the upper part of the calf, near the gastrocnemius muscle.
Electrode 2: Position it on the lower calf, a few centimeters above the Achilles tendon, avoiding direct placement over the most painful area.
Option 2 - Broad pain relief (for muscle tightness and soreness affecting the entire calf):
Electrode 1: Place it on the outer calf, near the lateral gastrocnemius head.
Electrode 2: Position it on the inner calf, near the medial gastrocnemius head, to provide balanced stimulation.
Option 3 - Chronic strain or long-term recovery (for stiffness and improved circulation in the calf):
Electrode 1: Place it on the middle of the calf, following the muscle fiber direction.
Electrode 2: Position it near the Achilles tendon insertion, avoiding direct pressure over the tendon itself. - Set the TENS device:
Mode: Conventional TENS (for immediate pain relief) or Burst TENS (for chronic muscle tightness)
Frequency: 80-120 Hz (for acute pain relief) or 2-4 Hz (for chronic stiffness and healing)
Pulse width: 200-300 µs for effective nerve stimulation
Intensity: Adjust to a comfortable tingling sensation, avoiding strong muscle contractions.
Duration: 20-30 minutes, 2-3 times per day.
Monitor the response: If symptoms worsen, adjust electrode placement or lower intensity. - Important: Avoid placing electrodes directly over a severely strained muscle, swollen areas, or the Achilles tendon, as excessive stimulation may worsen inflammation and delay healing. In cases of complete muscle rupture, seek medical evaluation before using TENS.
Morton’s Neuroma
Morton's neuroma is a painful condition caused by the thickening of the tissue surrounding a nerve in the ball of the foot, typically between the third and fourth toes. This compression leads to nerve irritation, causing sharp pain, burning, tingling, and numbness that worsens with prolonged walking, tight shoes, or high-impact activities. The discomfort often feels like stepping on a pebble or having a folded sock inside the shoe.
- Prepare the skin: Clean and dry the foot before applying electrodes. Trim excess hair if necessary to improve adhesion and conductivity.
- Select appropriate electrodes: Use small (2x2 cm) or medium (5x5 cm) electrodes to ensure precise nerve pathway stimulation while avoiding excessive pressure on the neuroma.
- Electrode positioning:
Option 1 - Localized pain relief (for tingling, numbness, or burning in the ball of the foot):
Electrode 1: Place it on the top of the foot, near the base of the affected toes.
Electrode 2: Position it on the sole of the foot, directly under the arch, avoiding placement over the painful neuroma area.
Option 2 - Broad pain relief (for symptoms radiating toward the toes or the heel):
Electrode 1: Place it on the inner side of the ankle, near the posterior tibial nerve.
Electrode 2: Position it on the sole of the foot, near the heel, to stimulate nerve conduction along a broader area.
Option 3 - Chronic pain and inflammation control (for long-term neuroma discomfort and hypersensitivity):
Electrode 1: Place it on the lower calf, following the tibial nerve pathway.
Electrode 2: Position it on the arch of the foot, ensuring it does not directly press over the painful neuroma. - Set the TENS device:
Mode: Conventional TENS (for immediate pain relief) or Modulated TENS (to prevent nerve adaptation)
Frequency: 80-120 Hz (for acute neuropathic pain) or 2-4 Hz (for chronic nerve sensitivity)
Pulse width: 200-300 µs for effective nerve stimulation
Intensity: Adjust to a gentle tingling sensation, avoiding excessive stimulation that may worsen nerve hypersensitivity.
Duration: 20-30 minutes, 2-3 times per day.
Monitor the response: If discomfort worsens, adjust electrode placement or lower intensity. - Important: Avoid placing electrodes directly over the neuroma, as excessive stimulation may aggravate nerve sensitivity and worsen symptoms. In cases of severe neuropathy, consult a specialist before using TENS.
Femoral Nerve Compression
Femoral nerve compression occurs when the femoral nerve, which controls sensation and motor function in the front of the thigh and lower leg, becomes compressed or irritated. This can be due to prolonged pressure, trauma, herniated discs, diabetes, or post-surgical complications. Symptoms include thigh pain, numbness, weakness in the quadriceps, and difficulty extending the knee or lifting the leg.
- Prepare the skin: Clean and dry the thigh area before applying electrodes. Trim excess hair if necessary to improve adhesion and conductivity.
- Select appropriate electrodes: Use medium (5x5 cm) or large (5x9 cm) electrodes to ensure proper nerve pathway stimulation without excessive pressure on the femoral nerve.
- Electrode positioning:
Option 1 - Localized pain relief (for numbness, tingling, or pain in the anterior thigh):
Electrode 1: Place it on the upper thigh, near the inguinal crease, where the femoral nerve exits the pelvis.
Electrode 2: Position it on the mid-thigh, following the femoral nerve path.
Option 2 - Broad pain relief (for radiating pain extending to the knee and lower leg):
Electrode 1: Place it on the lateral side of the hip, near the tensor fasciae latae (TFL).
Electrode 2: Position it on the lower thigh, just above the knee, ensuring proper nerve pathway coverage.
Option 3 - Chronic nerve compression and weakness (for long-term femoral nerve dysfunction):
Electrode 1: Place it on the lower lumbar spine (L2-L4), where the femoral nerve originates.
Electrode 2: Position it on the quadriceps muscle belly to enhance circulation and reduce muscle weakness. - Set the TENS device:
Mode: Conventional TENS (for immediate pain relief) or Burst TENS (for nerve modulation)
Frequency: 80-120 Hz (for acute nerve pain) or 2-4 Hz (for chronic nerve dysfunction)
Pulse width: 200-300 µs for effective nerve stimulation
Intensity: Adjust to a comfortable tingling sensation, avoiding excessive stimulation that may worsen nerve irritation.
Duration: 20-30 minutes, 2-3 times per day.
Monitor the response: If symptoms worsen, adjust electrode placement or lower intensity. - Important: Avoid placing electrodes directly over areas of severe nerve compression or inflammation, as excessive stimulation may aggravate symptoms. In cases of progressive weakness or severe nerve dysfunction, consult a specialist before using TENS.
Tibial Nerve Compression
Tibial nerve compression occurs when the tibial nerve, which runs down the back of the leg and into the foot, becomes compressed or irritated. This can be caused by conditions such as tarsal tunnel syndrome, trauma, inflammation, or prolonged pressure on the nerve. Symptoms often include burning pain, tingling, numbness, and weakness in the calf, heel, or sole of the foot, sometimes worsening with activity or prolonged standing.
- Prepare the skin: Clean and dry the area before applying electrodes. If necessary, trim excess hair to improve adhesion and conductivity.
- Select appropriate electrodes: Use small (2x2 cm) or medium (5x5 cm) electrodes for precise placement along the tibial nerve pathway without excessive pressure on the nerve itself.
- Electrode positioning:
Option 1 - Localized pain relief (for tingling, burning, or numbness along the tibial nerve):
Electrode 1: Place it on the inner side of the ankle, near the tarsal tunnel, where the tibial nerve passes into the foot.
Electrode 2: Position it on the sole of the foot, near the arch, to stimulate the nerve without direct pressure over the compression site.
Option 2 - Broad pain relief (for radiating pain extending to the calf and foot):
Electrode 1: Place it on the mid-calf, over the tibial nerve pathway.
Electrode 2: Position it on the heel or bottom of the foot to target the full nerve pathway.
Option 3 - Chronic pain relief and nerve sensitivity reduction (for persistent nerve irritation):
Electrode 1: Place it on the posterior knee, near the popliteal fossa, where the tibial nerve originates.
Electrode 2: Position it on the inner calf, following the nerve’s pathway down to the ankle. - Set the TENS device:
Mode: Conventional TENS (for immediate pain relief) or Modulated TENS (to prevent nerve adaptation)
Frequency: 80-120 Hz (for acute nerve pain) or 2-4 Hz (for chronic neuropathic pain)
Pulse width: 200-300 µs for effective nerve stimulation
Intensity: Adjust to a gentle tingling sensation, avoiding excessive stimulation that may increase nerve sensitivity.
Duration: 20-30 minutes, 2-3 times per day.
Monitor the response: If symptoms worsen, adjust electrode placement or lower intensity. - Important: Avoid placing electrodes directly over the tibial nerve compression site, as excessive stimulation may aggravate nerve irritation and worsen symptoms. In cases of progressive nerve dysfunction, consult a specialist before using TENS.