Electrical Muscle Stimulation (EMS) machines have gained significant popularity among athletes, physical therapists, and fitness enthusiasts for their ability to enhance muscle recovery, improve strength, and aid in rehabilitation. By delivering controlled electrical impulses, EMS devices stimulate muscle contractions, mimicking the natural process of exercise. However, correct electrode pad placement is essential to maximize muscle activation, prevent discomfort, and ensure safe, effective results.
In this comprehensive guide, we’ll cover the optimal electrode pad placement for EMS machines, depending on your training goals, muscle group targeting, and recovery needs. Whether you're using EMS for muscle strengthening, injury recovery, or reducing soreness, understanding where and how to place the pads will help you get the most out of your sessions. Let’s explore the best practices for proper EMS electrode placement!
EMS Electrode Placement for Upper Body
The upper body features some of the most visually appealing muscles in men, making EMS toning an effective way to enhance physical appearance. Below, you'll find the correct method for using pads to maximize stimulation:
Shoulders
EMS (Electrical Muscle Stimulation) for Shoulder Muscles is used to strengthen and rehabilitate the deltoid, rotator cuff, and surrounding muscles. This technique is beneficial for shoulder stability, injury prevention, post-surgery recovery, and athletic performance enhancement. EMS helps by stimulating motor neurons, leading to muscle contractions that can improve strength, endurance, and circulation.
EMS is effective for: rehabilitation after rotator cuff injuries, frozen shoulder recovery, strengthening weak muscles, reducing muscle imbalances, and post-exercise recovery. However, proper electrode placement and intensity settings are crucial to avoid overloading sensitive shoulder structures.
- Prepare the skin: Clean and dry the shoulder area before applying electrodes. Trim excess hair to improve adhesion and conductivity.
- Select appropriate electrodes: Use medium (5x5 cm) or large (5x9 cm) electrodes to effectively cover the muscle groups without excessive overlap.
- Electrode positioning:
Option 1 - Deltoid Muscle Strengthening (for general shoulder stability and performance):
Electrode 1: Place it on the anterior deltoid, near the front of the shoulder.
Electrode 2: Position it on the posterior deltoid, at the back of the shoulder.
Option 2 - Rotator Cuff Activation (for injury prevention and rehabilitation):
Electrode 1: Place it over the supraspinatus muscle, on the upper part of the scapula.
Electrode 2: Position it on the infraspinatus, just below the scapular spine.
Option 3 - Shoulder Recovery and Blood Flow Enhancement (for muscle relaxation post-exercise or injury):
Electrode 1: Place it on the lateral deltoid, at the midpoint of the shoulder.
Electrode 2: Position it on the upper trapezius, near the base of the neck. - Set the EMS device:
For Strengthening (Muscle Hypertrophy):
Frequency: 50-80 Hz
Pulse width: 300-400 µs
Intensity: Strong, visible muscle contractions.
Duration: 15-20 minutes.For Rehabilitation (Post-Injury or Weak Muscles):
Frequency: 10-30 Hz
Pulse width: 200-300 µs
Intensity: Mild contractions.
Duration: 15-25 minutes.For Recovery (Reducing Muscle Fatigue & Blood Flow Stimulation):
Frequency: 1-10 Hz
Pulse width: 150-250 µs
Intensity: Light tingling with minimal contractions.
Duration: 20-30 minutes. - Important: Avoid placing electrodes directly over the shoulder joint capsule or bony areas, as this may cause discomfort and limit proper muscle activation.
Biceps
EMS (Electrical Muscle Stimulation) for Biceps is used to enhance muscle strength, endurance, and recovery. This application is beneficial for rehabilitation after injuries, improving muscle function, post-surgical muscle activation, and optimizing performance in strength training. EMS stimulates motor neurons, inducing contractions that help increase muscle fiber recruitment and improve circulation.
EMS is effective for: strengthening weak biceps, post-injury muscle recovery, improving blood flow, and complementing traditional resistance training. However, proper electrode placement and intensity settings are crucial to ensure balanced activation without overloading tendons or small muscle groups.
- Prepare the skin: Clean and dry the biceps area before applying electrodes. Trim excess hair to improve adhesion and conductivity.
- Select appropriate electrodes: Use medium (5x5 cm) or large (5x9 cm) electrodes to effectively stimulate the muscle belly without placing excessive stress on tendons.
- Electrode positioning:
Option 1 - Biceps Strengthening (for muscle growth and endurance):
Electrode 1: Place it on the upper part of the biceps, near the shoulder.
Electrode 2: Position it on the lower part of the biceps, close to the elbow.
Option 2 - Rehabilitation and Post-Injury Recovery (for restoring muscle activation after injury or surgery):
Electrode 1: Place it on the middle of the biceps, following the muscle fiber direction.
Electrode 2: Position it on the brachialis muscle (lateral side of the arm) to enhance overall arm stability.
Option 3 - Recovery and Blood Flow Stimulation (for reducing muscle fatigue and improving circulation post-training):
Electrode 1: Place it on the lower part of the biceps, near the elbow joint.
Electrode 2: Position it on the triceps (posterior arm) to create a balanced stimulation effect. - Set the EMS device:
For Strengthening (Muscle Hypertrophy):
Frequency: 50-80 Hz
Pulse width: 300-400 µs
Intensity: Strong, visible muscle contractions.
Duration: 15-20 minutes.For Rehabilitation (Post-Injury or Weak Muscles):
Frequency: 10-30 Hz
Pulse width: 200-300 µs
Intensity: Mild contractions.
Duration: 15-25 minutes.For Recovery (Reducing Muscle Fatigue & Blood Flow Stimulation):
Frequency: 1-10 Hz
Pulse width: 150-250 µs
Intensity: Light tingling with minimal contractions.
Duration: 20-30 minutes. - Important: Avoid placing electrodes directly over tendons or the elbow joint, as this may cause discomfort and limit proper muscle activation.
Triceps
EMS (Electrical Muscle Stimulation) for Triceps is used to enhance muscle strength, endurance, and recovery. This application is particularly beneficial for rehabilitation after injuries, improving arm stability, post-surgical muscle activation, and complementing strength training. EMS stimulates motor neurons, causing controlled muscle contractions that increase muscle fiber recruitment and circulation.
EMS is effective for: building stronger triceps, post-injury recovery, improving muscle definition, reducing muscle imbalances, and optimizing arm function. However, proper electrode placement and intensity settings are essential to ensure optimal activation without overloading the tendons or elbow joint.
- Prepare the skin: Clean and dry the triceps area before applying electrodes. Trim excess hair to improve adhesion and conductivity.
- Select appropriate electrodes: Use medium (5x5 cm) or large (5x9 cm) electrodes to ensure effective coverage of the muscle belly without excessive overlap.
- Electrode positioning:
Option 1 - Triceps Strengthening (for muscle growth and endurance):
Electrode 1: Place it on the upper part of the triceps, near the shoulder.
Electrode 2: Position it on the lower part of the triceps, just above the elbow.
Option 2 - Rehabilitation and Post-Injury Recovery (for restoring muscle activation after injury or surgery):
Electrode 1: Place it on the middle of the triceps, aligned with the muscle fibers.
Electrode 2: Position it on the lateral triceps head to improve stability and function.
Option 3 - Recovery and Blood Flow Stimulation (for reducing muscle fatigue and enhancing post-training circulation):
Electrode 1: Place it on the lower part of the triceps, near the elbow joint.
Electrode 2: Position it on the biceps (anterior arm) to create a balanced muscle stimulation effect. - Set the EMS device:
For Strengthening (Muscle Hypertrophy):
Frequency: 50-80 Hz (to induce strong muscle contractions)
Pulse width: 300-400 µs (for deep muscle fiber recruitment)
Intensity: Adjust to a strong, visible muscle contraction.
Duration: 15-20 minutes per session.For Rehabilitation (Post-Injury or Post-Surgery Muscle Activation):
Frequency: 10-30 Hz (to gently activate muscle without excessive fatigue)
Pulse width: 200-300 µs (moderate nerve stimulation)
Intensity: Adjust to a mild contraction, ensuring comfort.
Duration: 15-25 minutes per session.For Recovery (Reducing Muscle Fatigue and Improving Circulation):
Frequency: 1-10 Hz (to stimulate blood flow and relaxation)
Pulse width: 150-250 µs (for light stimulation)
Intensity: Adjust to a slight tingling sensation with minimal contractions.
Duration: 20-30 minutes per session. - Important: Avoid placing electrodes directly over the elbow joint or tendons, as this may cause discomfort and limit proper muscle activation.
Forearms
EMS (Electrical Muscle Stimulation) for Forearms is used to strengthen the flexor and extensor muscles, improve grip strength, and aid in recovery from injuries or muscle fatigue. This application is particularly beneficial for rehabilitation after wrist or forearm injuries, improving muscle endurance, preventing overuse conditions, and enhancing performance in sports or manual activities. EMS stimulates motor neurons, generating muscle contractions that increase blood circulation, improve neuromuscular activation, and support muscle conditioning.
EMS is effective for: forearm strengthening, recovery from tendonitis or repetitive strain injuries, post-injury muscle activation, and improving muscle endurance. However, proper electrode placement and intensity settings are essential to prevent overstimulation of small muscle groups or tendons.
- Prepare the skin: Clean and dry the forearm before applying electrodes. Trim excess hair to improve adhesion and conductivity.
- Select appropriate electrodes: Use small (2x2 cm) or medium (5x5 cm) electrodes to ensure targeted stimulation of forearm muscles without excessive overlap.
- Electrode positioning:
Option 1 - Forearm Flexor Strengthening (for grip strength and endurance):
Electrode 1: Place it on the upper forearm, along the flexor muscles (inner side of the arm).
Electrode 2: Position it near the wrist, but avoiding direct placement over tendons.
Option 2 - Forearm Extensor Activation (for injury prevention and rehabilitation):
Electrode 1: Place it on the dorsal (outer) forearm, aligned with the extensor muscles.
Electrode 2: Position it near the elbow joint, following the muscle fibers.
Option 3 - Recovery and Blood Flow Stimulation (for reducing muscle fatigue and post-exercise relaxation):
Electrode 1: Place it in the mid-forearm, along the main muscle group.
Electrode 2: Position it on the wrist flexors (inner side), ensuring gentle stimulation. - Set the EMS device:
For Strengthening (Muscle Hypertrophy & Grip Enhancement):
Frequency: 50-80 Hz
Pulse width: 300-400 µs
Intensity: Strong, visible muscle contractions.
Duration: 15-20 minutes.For Rehabilitation (Post-Injury or Tendonitis Recovery):
Frequency: 10-30 Hz
Pulse width: 200-300 µs
Intensity: Mild contractions to activate muscles without excessive strain.
Duration: 15-25 minutes.For Recovery (Reducing Muscle Fatigue & Circulation Stimulation):
Frequency: 1-10 Hz
Pulse width: 150-250 µs
Intensity: Light tingling with minimal contractions.
Duration: 20-30 minutes. - Important: Avoid placing electrodes directly over the wrist tendons or bony areas, as this may cause discomfort and limit proper muscle activation.
EMS Electrode Placement for Core and Back
The core houses all vital organs, making its strengthening extremely important. The positioning of the electrodes must be precise, as incorrect placement combined with excessive intensity can cause discomfort in organs such as the kidneys or liver. Follow the instructions below to do it correctly:
Rectus Abdominis
EMS (Electrical Muscle Stimulation) for Rectus Abdominis is used to enhance core strength, endurance, and muscle recovery. This application is particularly beneficial for rehabilitation after abdominal surgeries, improving muscle definition, supporting posture, and complementing core strength training. EMS stimulates the motor neurons, causing controlled muscle contractions that activate deep abdominal fibers, enhance neuromuscular coordination, and improve circulation.
EMS is effective for: developing stronger abdominal muscles, recovering from post-surgical muscle atrophy, improving muscle endurance, and aiding in rehabilitation from lower back pain by strengthening core stability. However, proper electrode placement and intensity settings are crucial to ensure effective stimulation without discomfort or excessive fatigue.
- Prepare the skin: Clean and dry the abdominal area before applying electrodes. Remove any excess hair to improve adhesion and conductivity.
- Select appropriate electrodes: Use medium (5x5 cm) or large (5x9 cm) electrodes to ensure even stimulation across the muscle.
- Electrode positioning:
Option 1 - Abdominal Strengthening (for core power and endurance):
Electrode 1: Place it 2 cm above the navel, centered on the rectus abdominis.
Electrode 2: Position it 2-3 cm below the navel, ensuring full muscle activation.
Option 2 - Post-Surgery Recovery & Core Activation (for muscle rehabilitation after abdominal surgery or weakness):
Electrode 1: Place it on the upper part of the rectus abdominis, near the sternum.
Electrode 2: Position it lower on the abdomen, just above the pubic area.
Option 3 - Recovery and Circulation Enhancement (for reducing post-workout muscle fatigue and improving blood flow):
Electrode 1: Place it on the left side of the abdomen, horizontally aligned with the navel.
Electrode 2: Position it on the right side, mirroring the first electrode. - Set the EMS device:
For Strengthening (Core Muscle Hypertrophy & Endurance):
Frequency: 50-80 Hz
Pulse width: 300-400 µs
Intensity: Strong, visible muscle contractions.
Duration: 15-20 minutes.For Rehabilitation (Post-Surgery or Weak Abdominal Muscles):
Frequency: 10-30 Hz
Pulse width: 200-300 µs
Intensity: Mild contractions for gentle muscle activation.
Duration: 15-25 minutes.For Recovery (Reducing Muscle Fatigue & Circulation Stimulation):
Frequency: 1-10 Hz
Pulse width: 150-250 µs
Intensity: Light tingling with minimal contractions.
Duration: 20-30 minutes. - Important: Avoid placing electrodes directly over the ribs or the lower abdominal area near vital organs. Ensure muscle activation is controlled and does not cause discomfort.
Obliques
EMS (Electrical Muscle Stimulation) for Oblique Abdominal Muscles is used to strengthen the external and internal obliques, improve core stability, and aid in recovery from injuries or muscle imbalances. This application is particularly beneficial for enhancing lateral core strength, supporting spinal health, post-surgical recovery, and complementing functional training. EMS stimulates motor neurons, generating controlled muscle contractions that increase core endurance, improve neuromuscular coordination, and enhance blood circulation.
EMS is effective for: oblique muscle strengthening, post-injury rehabilitation, improving rotational stability, and aiding in lower back pain management by enhancing core activation. However, proper electrode placement and intensity settings are essential to prevent excessive stimulation of sensitive areas.
- Prepare the skin: Clean and dry the lateral abdominal area before applying electrodes. Remove any excess hair to improve adhesion and conductivity.
- Select appropriate electrodes: Use medium (5x5 cm) or large (5x9 cm) electrodes to ensure proper stimulation without excessive overlap.
- Electrode positioning:
Option 1 - Oblique Strengthening (for core power and lateral endurance):
Electrode 1: Place it on the upper lateral side of the external oblique, near the lower ribs.
Electrode 2: Position it on the lower external oblique, just above the hip bone.
Option 2 - Post-Surgery Recovery & Core Activation (for muscle rehabilitation after abdominal surgery or weakness):
Electrode 1: Place it over the internal oblique muscle, slightly closer to the midline of the abdomen.
Electrode 2: Position it on the lower oblique muscle, following the natural diagonal fiber direction.
Option 3 - Recovery and Circulation Enhancement (for reducing muscle fatigue and improving blood flow):
Electrode 1: Place it on the left external oblique, diagonally aligned.
Electrode 2: Position it on the right external oblique, mirroring the first electrode. - Set the EMS device:
For Strengthening (Oblique Muscle Hypertrophy & Stability):
Frequency: 50-80 Hz
Pulse width: 300-400 µs
Intensity: Strong, visible muscle contractions.
Duration: 15-20 minutes.For Rehabilitation (Post-Surgery or Weak Core Muscles):
Frequency: 10-30 Hz
Pulse width: 200-300 µs
Intensity: Mild contractions for gentle activation.
Duration: 15-25 minutes.For Recovery (Reducing Muscle Fatigue & Circulation Stimulation):
Frequency: 1-10 Hz
Pulse width: 150-250 µs
Intensity: Light tingling with minimal contractions.
Duration: 20-30 minutes. - Important: Avoid placing electrodes directly over the ribs or too close to the lower abdomen near vital organs. Ensure contractions are controlled and do not cause discomfort.
Chest
EMS (Electrical Muscle Stimulation) for Chest Muscles is an effective tool for enhancing pectoralis major and minor strength, endurance, and recovery. It is particularly beneficial for rehabilitation after muscle injuries, post-surgical recovery, improving upper body stability, and optimizing performance in strength training. EMS stimulates motor neurons, leading to controlled muscle contractions that increase muscle fiber recruitment, improve circulation, and enhance neuromuscular coordination.
EMS is effective for: building chest muscle mass, recovering from post-surgical atrophy, increasing muscular endurance, and supporting functional strength for pushing and lifting movements. However, proper electrode placement and intensity settings are crucial to prevent discomfort, ineffective stimulation, or unwanted strain on adjacent muscles and joints.
- Prepare the skin: Clean and dry the chest area before applying electrodes. Trim excess hair to ensure better adhesion and conductivity.
- Select appropriate electrodes: Use large (5x9 cm) electrodes for even stimulation across the pectoral muscles. If targeting a smaller area (such as post-surgical recovery), medium (5x5 cm) electrodes may be used.
- Electrode positioning:
Option 1 - Chest Strengthening (for hypertrophy and explosive power):
Electrode 1: Place it on the upper part of the pectoralis major, approximately 2-3 cm below the clavicle.
Electrode 2: Position it on the lower part of the pectoralis major, near the lower ribcage but avoiding bony areas.
Option 2 - Post-Surgery Recovery & Muscle Activation (for rehabilitation after injuries or chest surgery):
Electrode 1: Place it horizontally over the middle of the pectoralis major, following the natural direction of the muscle fibers.
Electrode 2: Position it on the lateral side of the chest, near the anterior deltoid (shoulder area), ensuring muscle engagement without affecting delicate post-surgical tissues.
Option 3 - Recovery and Blood Flow Enhancement (for reducing muscle fatigue and improving circulation after training or injury):
Electrode 1: Place it on the left upper chest, aligned with the clavicle.
Electrode 2: Position it on the right upper chest, mirroring the first electrode, ensuring a symmetrical contraction for recovery purposes. - Set the EMS device:
For Strengthening (Hypertrophy & Power Development):
Frequency: 50-80 Hz (optimal for strong contractions)
Pulse width: 300-400 µs (for deep muscle recruitment)
Intensity: Adjust to strong, visible muscle contractions, but without discomfort or pain.
Duration: 15-20 minutes.For Rehabilitation (Post-Surgery or Weak Pectoral Muscles):
Frequency: 10-30 Hz (to gently activate muscles without strain)
Pulse width: 200-300 µs (moderate nerve stimulation)
Intensity: Mild contractions that remain comfortable and controlled.
Duration: 15-25 minutes.For Recovery (Reducing Muscle Fatigue & Blood Flow Stimulation):
Frequency: 1-10 Hz (to improve circulation and relaxation)
Pulse width: 150-250 µs (for light stimulation)
Intensity: Gentle tingling with minimal contractions, focused on blood flow enhancement.
Duration: 20-30 minutes. - Important: Avoid placing electrodes directly over the sternum or close to the heart. Ensure muscle contractions are symmetrical and do not cause discomfort or overstrain.
Lower Back
EMS (Electrical Muscle Stimulation) for the Lower Back is used to strengthen the erector spinae, quadratus lumborum, and deep stabilizing muscles. This technique is particularly beneficial for rehabilitation after lower back injuries, improving spinal stability, reducing muscular tension, and complementing core-strengthening exercises. EMS activates motor neurons, inducing controlled contractions that enhance neuromuscular coordination, improve circulation, and reduce muscle stiffness.
EMS is effective for: reducing lower back pain, post-injury muscle recovery, increasing lumbar stability, and relieving chronic muscle tension. However, proper electrode placement and intensity settings are crucial to prevent overstimulation of sensitive spinal structures.
- Prepare the skin: Clean and dry the lower back area before applying electrodes. Trim excess hair to improve adhesion and conductivity.
- Select appropriate electrodes: Use medium (5x5 cm) or large (5x9 cm) electrodes to cover the lumbar region effectively.
- Electrode positioning:
Option 1 - Lower Back Strengthening (for core stability and endurance):
Electrode 1: Place it on the left lumbar muscles, parallel to the spine (approximately 3-5 cm away).
Electrode 2: Position it on the right lumbar muscles, mirroring the first electrode.
Option 2 - Post-Injury Recovery & Pain Relief (for muscle activation and tension release):
Electrode 1: Place it on the upper lumbar region, just below the ribcage.
Electrode 2: Position it on the lower lumbar region, near the sacrum, avoiding direct placement over the spine.
Option 3 - Recovery and Blood Flow Enhancement (for reducing stiffness and improving mobility):
Electrode 1: Place it on the left lower back, aligned horizontally.
Electrode 2: Position it on the right lower back, maintaining symmetrical placement. - Set the EMS device:
For Strengthening (Lumbar Stability & Endurance):
Frequency: 50-80 Hz
Pulse width: 300-400 µs
Intensity: Strong, visible muscle contractions without causing discomfort.
Duration: 15-20 minutes.For Rehabilitation (Post-Injury or Weak Lower Back Muscles):
Frequency: 10-30 Hz
Pulse width: 200-300 µs
Intensity: Mild contractions, avoiding excessive strain.
Duration: 15-25 minutes.For Recovery (Reducing Muscle Fatigue & Circulation Stimulation):
Frequency: 1-10 Hz
Pulse width: 150-250 µs
Intensity: Gentle tingling with minimal contractions.
Duration: 20-30 minutes. - Important: Avoid placing electrodes directly over the spine or near the kidneys. Ensure contractions are controlled and symmetrical.
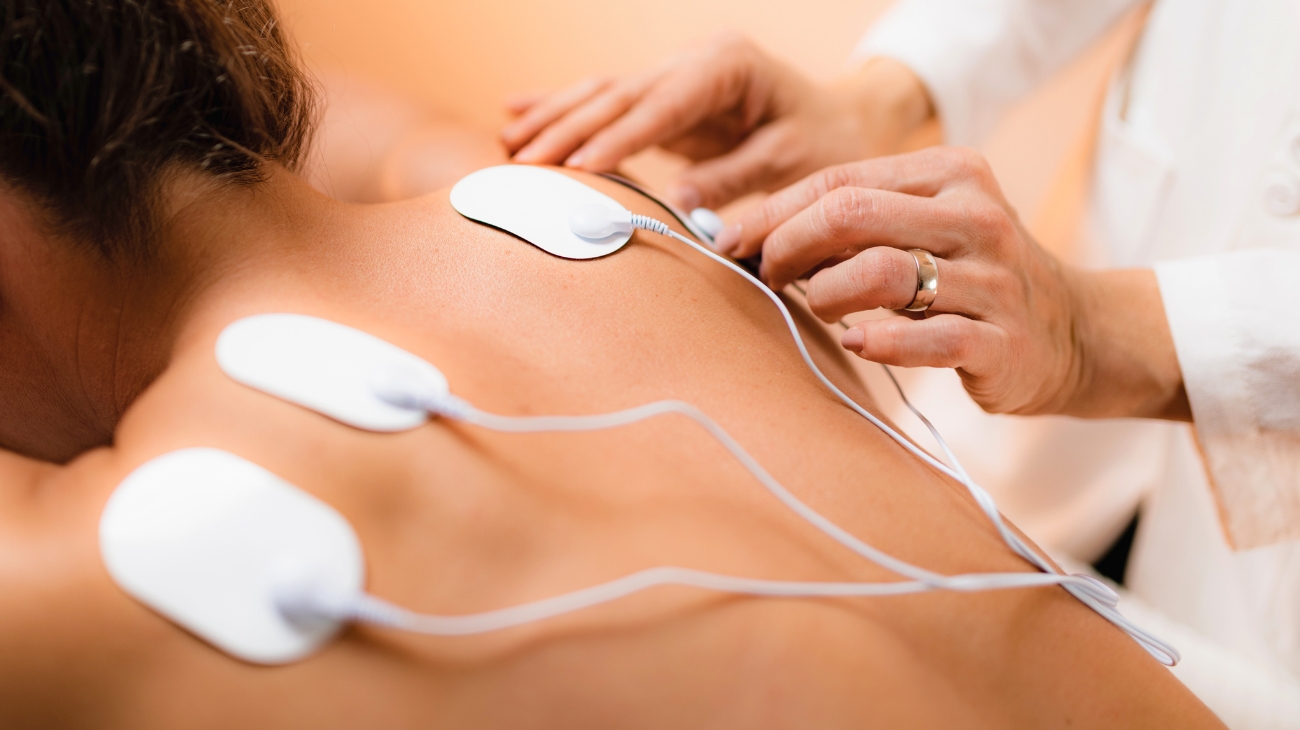
Latissimus Dorsi
EMS (Electrical Muscle Stimulation) for Latissimus Dorsi is used to strengthen and improve endurance in the latissimus dorsi, one of the largest muscles in the back responsible for pulling movements, posture stabilization, and upper-body strength. This application is beneficial for enhancing back strength, postural support, injury rehabilitation, and muscle recovery after intense workouts.
EMS is effective for: strengthening the lats for sports performance, post-injury rehabilitation, reducing muscle imbalances, and relieving tension from overuse. However, proper electrode placement and intensity settings are crucial to avoid overstimulation of surrounding structures, such as the trapezius or lower back.
- Prepare the skin: Clean and dry the latissimus dorsi area before applying electrodes. Trim excess hair to improve adhesion and conductivity.
- Select appropriate electrodes: Use large (5x9 cm) electrodes to ensure full muscle activation. Medium (5x5 cm) electrodes can be used for targeted stimulation.
- Electrode positioning:
Option 1 - Lat Strengthening (for muscle growth and endurance in pulling movements):
Electrode 1: Place it on the upper part of the latissimus dorsi, near the armpit and lower edge of the scapula.
Electrode 2: Position it on the lower part of the latissimus dorsi, just above the waistline, following the muscle fiber direction.
Option 2 - Rehabilitation & Muscle Activation (for post-injury recovery or correcting imbalances):
Electrode 1: Place it on the middle section of the lat, aligned with the thoracic spine.
Electrode 2: Position it on the lower lateral border of the muscle, near the lumbar region.
Option 3 - Recovery and Circulation Enhancement (for reducing soreness and improving post-workout recovery):
Electrode 1: Place it diagonally across the lat, from the lower ribs to the mid-back.
Electrode 2: Position it on the opposite lat, ensuring balanced stimulation. - Set the EMS device:
For Strengthening (Muscle Hypertrophy & Power Development):
Frequency: 50-80 Hz
Pulse width: 300-400 µs
Intensity: Strong, visible muscle contractions without discomfort.
Duration: 15-20 minutes.For Rehabilitation (Post-Injury or Muscle Imbalance Correction):
Frequency: 10-30 Hz
Pulse width: 200-300 µs
Intensity: Mild contractions that remain comfortable and controlled.
Duration: 15-25 minutes.For Recovery (Reducing Muscle Fatigue & Circulation Stimulation):
Frequency: 1-10 Hz
Pulse width: 150-250 µs
Intensity: Gentle tingling with minimal contractions.
Duration: 20-30 minutes. - Important: Avoid placing electrodes directly over the spine or ribcage, as this may cause discomfort and limit effective muscle activation.
Neck and Cervical
EMS (Electrical Muscle Stimulation) for Neck Muscles is primarily used to enhance cervical muscle strength, postural endurance, and recovery from tension or injuries. It is particularly beneficial for relieving neck pain, improving postural stability, aiding in rehabilitation after whiplash injuries, and reducing muscle stiffness from prolonged screen time or poor posture. EMS stimulates motor neurons, inducing controlled contractions that promote neuromuscular coordination, enhance circulation, and alleviate muscle fatigue.
EMS is effective for: reducing neck pain, improving cervical muscle endurance, rehabilitating weak muscles, and relieving tension from overuse. However, extreme caution must be taken with electrode placement and intensity settings, as improper application can affect sensitive nerves or blood vessels.
- Prepare the skin: Clean and dry the neck area before applying electrodes. Avoid applying electrodes over areas with excessive hair or open wounds.
- Select appropriate electrodes: Use small (2x2 cm) or medium (5x5 cm) electrodes to ensure precise and safe stimulation of the cervical muscles.
- Electrode positioning:
Option 1 - Neck Muscle Strengthening (for postural endurance and cervical support):
Electrode 1: Place it on the left side of the posterior neck, along the upper trapezius muscle.
Electrode 2: Position it on the right side of the posterior neck, mirroring the first electrode.
Option 2 - Rehabilitation & Tension Relief (for reducing stiffness and improving mobility after neck strain):
Electrode 1: Place it at the base of the neck, just above the upper trapezius.
Electrode 2: Position it slightly lower, following the natural muscle fiber direction.
Option 3 - Recovery and Circulation Enhancement (for reducing soreness and muscle fatigue):
Electrode 1: Place it on the left upper trapezius, near the shoulder.
Electrode 2: Position it on the right upper trapezius, ensuring balanced stimulation. - Set the EMS device:
For Strengthening (Cervical Muscle Stability & Endurance):
Frequency: 30-50 Hz
Pulse width: 250-350 µs
Intensity: Moderate contractions that support posture without excessive strain.
Duration: 10-15 minutes.For Rehabilitation (Post-Injury or Muscle Tension Release):
Frequency: 10-25 Hz
Pulse width: 200-300 µs
Intensity: Mild contractions, avoiding excessive strain or discomfort.
Duration: 10-15 minutes.For Recovery (Reducing Muscle Fatigue & Circulation Stimulation):
Frequency: 1-10 Hz
Pulse width: 150-250 µs
Intensity: Light tingling with minimal contractions.
Duration: 15-20 minutes. - Important: Avoid placing electrodes on the front of the neck, over the carotid arteries, or directly on the spine. Only apply EMS on the lateral and posterior neck muscles to prevent adverse effects.
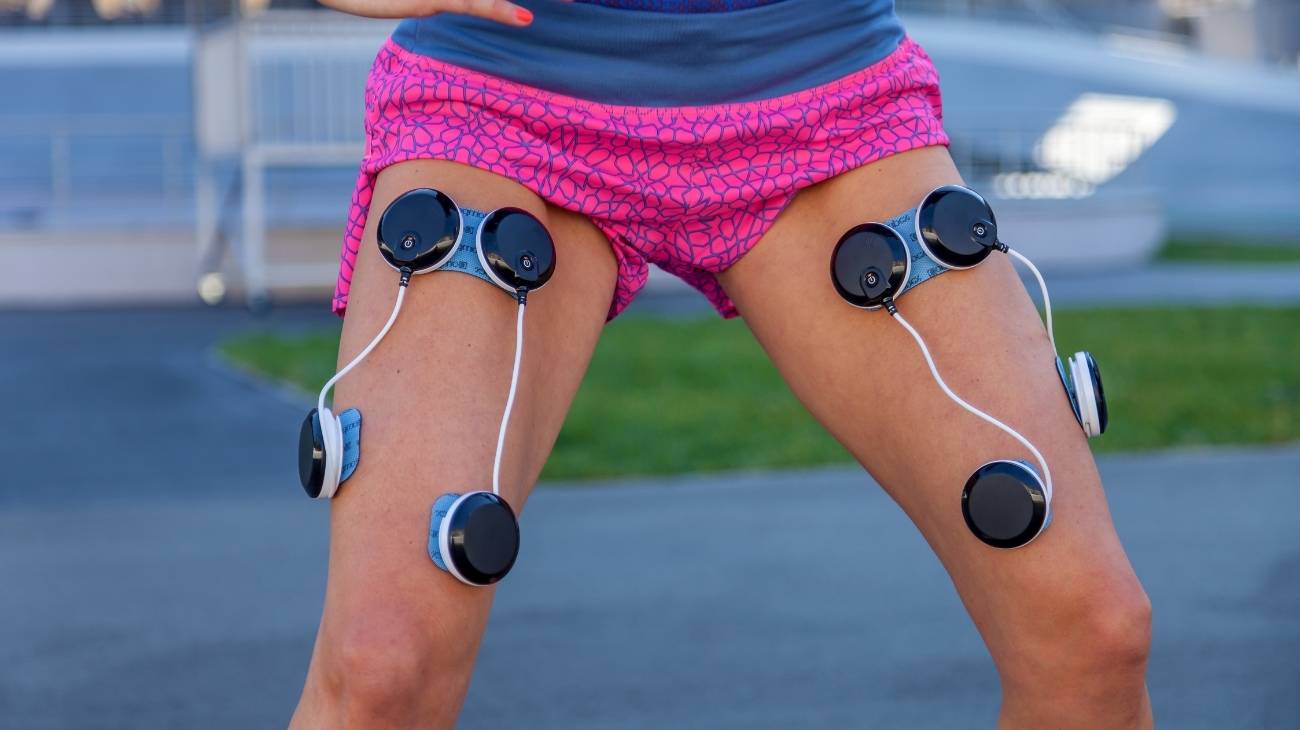
EMS Electrode Placement for Lower Body
When it comes to muscle strengthening, few areas are as demanding as the legs, which form the majority of the lower body's anatomy. For proper muscle stimulation with EMS, electrodes should be placed as follows:
Glutes
EMS (Electrical Muscle Stimulation) for Glute Muscles is an effective tool for enhancing the gluteus maximus, medius, and minimus, improving lower body strength, endurance, and stability. This application is particularly beneficial for rehabilitation after hip injuries, improving athletic performance, postural support, and muscle recovery after workouts. EMS activates motor neurons, generating controlled contractions that enhance muscle fiber recruitment, increase circulation, and improve neuromuscular coordination.
EMS is effective for: glute muscle strengthening, post-injury recovery, hip stabilization, and reducing muscle imbalances that contribute to lower back and knee pain. However, proper electrode placement and intensity settings are crucial to ensure optimal activation without overstimulation of nearby joints or nerves.
- Prepare the skin: Clean and dry the gluteal area before applying electrodes. Trim excess hair to improve adhesion and conductivity.
- Select appropriate electrodes: Use large (5x9 cm) electrodes to cover the glute muscles effectively. Medium (5x5 cm) electrodes can be used for targeted stimulation.
- Electrode positioning:
Option 1 - Glute Strengthening (for power, endurance, and explosive movements):
Electrode 1: Place it on the upper gluteus maximus, near the sacrum.
Electrode 2: Position it on the lower part of the gluteus maximus, just above the hamstring insertion.
Option 2 - Rehabilitation & Muscle Activation (for post-injury recovery and hip stabilization):
Electrode 1: Place it on the gluteus medius, laterally positioned near the iliac crest.
Electrode 2: Position it on the lower gluteus maximus, ensuring alignment with the natural muscle fibers.
Option 3 - Recovery and Circulation Enhancement (for reducing muscle fatigue and improving post-workout recovery):
Electrode 1: Place it on the left gluteus maximus, diagonally positioned across the muscle.
Electrode 2: Position it on the right gluteus maximus, mirroring the first electrode to balance stimulation. - Set the EMS device:
For Strengthening (Glute Muscle Hypertrophy & Explosive Power):
Frequency: 50-80 Hz
Pulse width: 300-400 µs
Intensity: Strong, visible muscle contractions without discomfort.
Duration: 15-20 minutes.For Rehabilitation (Post-Injury or Hip Stability Training):
Frequency: 10-30 Hz
Pulse width: 200-300 µs
Intensity: Mild contractions that remain comfortable and controlled.
Duration: 15-25 minutes.For Recovery (Reducing Muscle Fatigue & Circulation Stimulation):
Frequency: 1-10 Hz
Pulse width: 150-250 µs
Intensity: Gentle tingling with minimal contractions.
Duration: 20-30 minutes. - Important: Avoid placing electrodes directly over the sacrum or sciatic nerve, as this may cause discomfort and ineffective muscle activation.
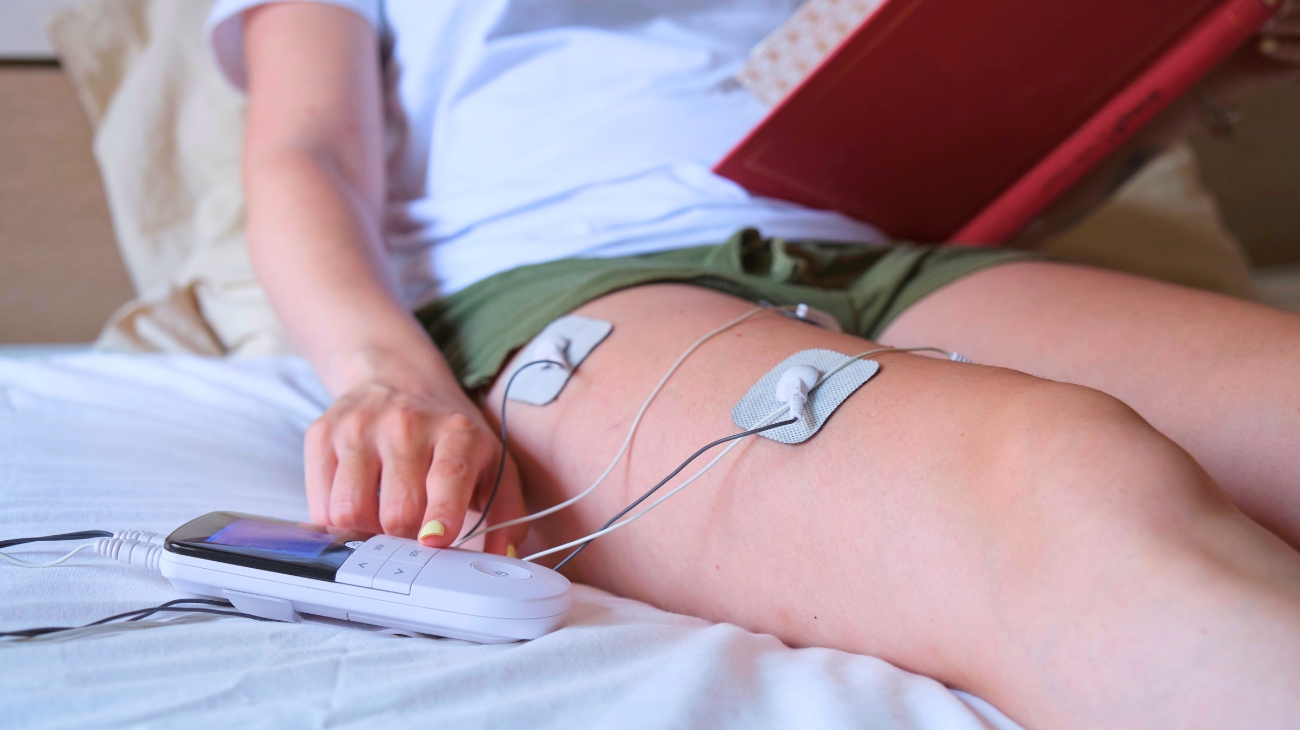
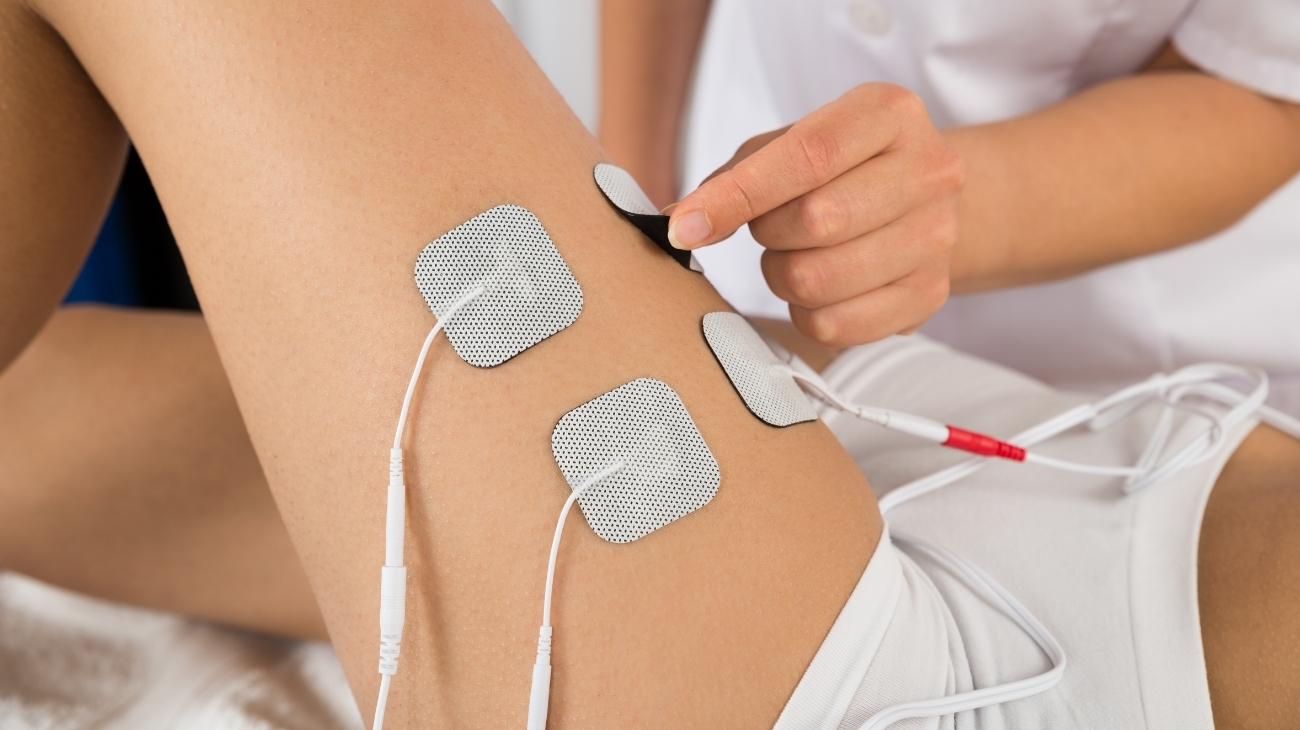
Quadriceps
EMS (Electrical Muscle Stimulation) for Quadriceps Muscles is widely used for strengthening, rehabilitation, injury prevention, and recovery. The quadriceps consist of four muscles: rectus femoris, vastus lateralis, vastus medialis, and vastus intermedius, all essential for knee extension, stability, and lower body power. EMS stimulates motor neurons, leading to enhanced muscle fiber recruitment, improved circulation, and faster recovery from fatigue or injury.
EMS is effective for: increasing quadriceps strength, restoring function after surgery or injury, preventing muscle atrophy, and supporting performance in sports and rehabilitation. However, proper electrode placement and intensity settings are crucial to avoid overstimulation, especially around the knee joint.
- Prepare the skin: Clean and dry the quadriceps area before applying electrodes. Trim excess hair to improve adhesion and conductivity.
- Select appropriate electrodes: Use large (5x9 cm) electrodes for full quadriceps engagement. Medium (5x5 cm) electrodes can be used for targeted stimulation.
- Electrode positioning:
Option 1 - Quadriceps Strengthening (for hypertrophy, endurance, and power):
Electrode 1: Place it on the upper rectus femoris, near the hip flexor region.
Electrode 2: Position it on the lower rectus femoris, just above the patella, ensuring proper alignment with the muscle fibers.
Option 2 - Rehabilitation & Post-Injury Recovery (for knee stabilization and neuromuscular activation):
Electrode 1: Place it on the vastus medialis (inner quadriceps) to support patellar alignment and knee stability.
Electrode 2: Position it on the vastus lateralis (outer quadriceps) to balance muscle engagement and prevent imbalances.
Option 3 - Recovery and Circulation Enhancement (for reducing post-workout fatigue and muscle soreness):
Electrode 1: Place it on the mid-quadriceps, near the rectus femoris.
Electrode 2: Position it slightly lower, ensuring even muscle relaxation and blood flow stimulation. - Set the EMS device:
For Strengthening (Hypertrophy & Power Development):
Frequency: 60-80 Hz (for maximum muscle fiber recruitment).
Pulse width: 300-400 µs (deep muscle penetration).
Intensity: Strong, visible muscle contractions without excessive discomfort.
Duration: 15-20 minutes.For Rehabilitation (Post-Surgery or Weak Quadriceps):
Frequency: 10-30 Hz (for neuromuscular re-education).
Pulse width: 200-300 µs (moderate nerve activation).
Intensity: Gentle contractions to restore function without excessive stress.
Duration: 15-25 minutes.For Recovery (Reducing Muscle Fatigue & Circulation Stimulation):
Frequency: 1-10 Hz (to improve circulation and reduce stiffness).
Pulse width: 150-250 µs (for mild nerve activation).
Intensity: Light tingling with minimal contractions.
Duration: 20-30 minutes. - Important: Avoid placing electrodes directly over the knee joint or bony structures, as this may cause discomfort and interfere with proper muscle activation.
Abductors
EMS (Electrical Muscle Stimulation) for Abductor Muscles is used to strengthen the gluteus medius, gluteus minimus, and tensor fasciae latae (TFL), which are responsible for hip stabilization, lateral leg movement, and injury prevention. This application is particularly beneficial for rehabilitation after hip injuries, improving lower body stability, reducing knee valgus issues, and enhancing athletic performance.
EMS is effective for: increasing hip stability, preventing muscle imbalances, recovering from injuries, and improving lateral movement strength. However, proper electrode placement and intensity settings are crucial to prevent overstimulation of surrounding structures, such as the IT band or hip joint.
- Prepare the skin: Clean and dry the lateral hip and upper thigh area before applying electrodes. Trim excess hair for better adhesion and conductivity.
- Select appropriate electrodes: Use medium (5x5 cm) or large (5x9 cm) electrodes to cover the hip abductors effectively.
- Electrode positioning:
Option 1 - Hip Abductor Strengthening (for muscle endurance, power, and lateral stability):
Electrode 1: Place it on the upper part of the gluteus medius, near the iliac crest.
Electrode 2: Position it on the lower part of the gluteus medius, slightly above the greater trochanter of the femur.
Option 2 - Rehabilitation & Injury Prevention (for post-injury recovery or reducing knee instability):
Electrode 1: Place it on the tensor fasciae latae (TFL), near the front of the hip.
Electrode 2: Position it along the lateral thigh, near the vastus lateralis, ensuring proper muscle engagement.
Option 3 - Recovery and Circulation Enhancement (for reducing muscle fatigue and improving mobility):
Electrode 1: Place it on the lateral hip, near the gluteus medius.
Electrode 2: Position it along the IT band to support lateral muscle activation. - Set the EMS device:
For Strengthening (Hip Stability & Power Development):
Frequency: 50-80 Hz
Pulse width: 300-400 µs
Intensity: Strong, visible muscle contractions without discomfort.
Duration: 15-20 minutes.For Rehabilitation (Post-Injury or Knee Valgus Correction):
Frequency: 10-30 Hz
Pulse width: 200-300 µs
Intensity: Mild contractions to stimulate recovery without excessive strain.
Duration: 15-25 minutes.For Recovery (Reducing Muscle Fatigue & Circulation Stimulation):
Frequency: 1-10 Hz
Pulse width: 150-250 µs
Intensity: Gentle tingling with minimal contractions.
Duration: 20-30 minutes. - Important: Avoid placing electrodes directly over the hip joint or IT band to prevent discomfort and ineffective muscle activation.
Hamstrings
EMS (Electrical Muscle Stimulation) for Hamstrings is commonly used to improve strength, enhance endurance, accelerate recovery, and prevent injuries. The hamstrings, consisting of the biceps femoris, semitendinosus, and semimembranosus, play a crucial role in knee flexion, hip extension, sprinting, and explosive movements. EMS enhances neuromuscular activation, promoting greater muscle fiber recruitment, improved circulation, and faster recovery from injuries or fatigue.
EMS is effective for: hamstring strengthening, rehabilitation from muscle strains, post-surgical recovery, and reducing injury risk. However, proper electrode placement and intensity settings are essential to ensure safe and effective stimulation, preventing overstimulation of the knee or sciatic nerve.
- Prepare the skin: Clean and dry the hamstring area before applying electrodes. Trim excess hair for better adhesion and conductivity.
- Select appropriate electrodes: Use large (5x9 cm) electrodes for full hamstring activation. Medium (5x5 cm) electrodes can be used for targeted stimulation.
- Electrode positioning:
Option 1 - Hamstring Strengthening (for power, endurance, and explosive movements):
Electrode 1: Place it on the upper hamstring, near the gluteal fold.
Electrode 2: Position it on the lower hamstring, just above the knee joint, avoiding direct contact with the back of the knee.
Option 2 - Rehabilitation & Post-Injury Recovery (for muscle strain healing and functional recovery):
Electrode 1: Place it on the medial hamstring (semimembranosus and semitendinosus) to support knee stabilization.
Electrode 2: Position it on the lateral hamstring (biceps femoris) to balance stimulation across the hamstring complex.
Option 3 - Recovery and Circulation Enhancement (for reducing muscle fatigue and post-workout soreness):
Electrode 1: Place it on the mid-hamstring, near the biceps femoris.
Electrode 2: Position it slightly lower, ensuring even muscle relaxation and blood flow stimulation. - Set the EMS device:
For Strengthening (Muscle Hypertrophy & Power Development):
Frequency: 50-80 Hz
Pulse width: 300-400 µs
Intensity: Strong, visible muscle contractions without excessive discomfort.
Duration: 15-20 minutes.For Rehabilitation (Post-Injury or Weak Hamstrings):
Frequency: 10-30 Hz
Pulse width: 200-300 µs
Intensity: Mild contractions to stimulate recovery without excessive strain.
Duration: 15-25 minutes.For Recovery (Reducing Muscle Fatigue & Circulation Stimulation):
Frequency: 1-10 Hz
Pulse width: 150-250 µs
Intensity: Gentle tingling with minimal contractions.
Duration: 20-30 minutes. - Important: Avoid placing electrodes directly over the back of the knee or sciatic nerve, as this may cause discomfort and interfere with proper muscle activation.
Calf
EMS (Electrical Muscle Stimulation) for Calf Muscles is widely used for strengthening, rehabilitation, endurance enhancement, and recovery. The calf consists of two primary muscles: the gastrocnemius (which provides explosive power) and the soleus (which is crucial for endurance and posture). EMS enhances neuromuscular activation, promoting greater muscle fiber recruitment, improved circulation, and faster recovery from fatigue or injuries.
EMS is effective for: calf muscle strengthening, rehabilitation from injuries such as strains or Achilles tendinitis, post-surgical recovery, and improving lower limb endurance. However, proper electrode placement and intensity settings are essential to ensure safe and effective stimulation without overstimulation of the Achilles tendon or deep nerves.
- Prepare the skin: Clean and dry the calf area before applying electrodes. Trim excess hair for better adhesion and conductivity.
- Select appropriate electrodes: Use medium (5x5 cm) or large (5x9 cm) electrodes for even stimulation across the calf muscles.
- Electrode positioning:
Option 1 - Calf Strengthening (for explosive power, endurance, and athletic performance):
Electrode 1: Place it on the upper gastrocnemius, near the knee joint, but avoiding direct placement over tendons.
Electrode 2: Position it on the lower gastrocnemius, just above the Achilles tendon, ensuring safe placement.
Option 2 - Rehabilitation & Post-Injury Recovery (for muscle strain healing and Achilles tendinitis support):
Electrode 1: Place it on the soleus muscle (lower calf), aligned with the Achilles tendon but at least 2 cm away from it.
Electrode 2: Position it on the lateral gastrocnemius to balance muscle activation and prevent overloading.
Option 3 - Recovery and Circulation Enhancement (for reducing muscle fatigue and post-workout soreness):
Electrode 1: Place it on the mid-calf, near the belly of the gastrocnemius.
Electrode 2: Position it slightly lower, ensuring balanced stimulation for blood flow improvement. - Set the EMS device:
For Strengthening (Power & Endurance Development):
Frequency: 50-80 Hz
Pulse width: 300-400 µs
Intensity: Strong, visible muscle contractions without excessive discomfort.
Duration: 15-20 minutes.For Rehabilitation (Post-Injury or Weak Calf Muscles):
Frequency: 10-30 Hz
Pulse width: 200-300 µs
Intensity: Mild contractions to stimulate recovery without excessive strain.
Duration: 15-25 minutes.For Recovery (Reducing Muscle Fatigue & Circulation Stimulation):
Frequency: 1-10 Hz
Pulse width: 150-250 µs
Intensity: Gentle tingling with minimal contractions.
Duration: 20-30 minutes. - Important: Avoid placing electrodes directly over the Achilles tendon or the back of the knee to prevent discomfort and potential nerve irritation.
Soleus
EMS (Electrical Muscle Stimulation) for Soleus is specifically used to enhance strength, endurance, postural stability, and recovery. The soleus, located beneath the gastrocnemius, plays a crucial role in walking, running, standing posture, and venous return in the lower limbs. EMS enhances neuromuscular activation, leading to greater muscle fiber recruitment, improved blood circulation, and faster recovery from fatigue or injuries.
EMS is effective for: soleus muscle strengthening, rehabilitation after injuries, improving ankle stability, and reducing lower limb fatigue. However, proper electrode placement and intensity settings are critical to prevent overstimulation of the Achilles tendon or irritation of deep nerves.
- Prepare the skin: Clean and dry the lower calf area before applying electrodes. Trim excess hair for better adhesion and conductivity.
- Select appropriate electrodes: Use small (2x2 cm) or medium (5x5 cm) electrodes to ensure targeted stimulation of the soleus.
- Electrode positioning:
Option 1 - Soleus Strengthening (for endurance, posture, and venous return improvement):
Electrode 1: Place it on the upper portion of the soleus, about 5 cm above the Achilles tendon.
Electrode 2: Position it on the mid-soleus, ensuring the electrode follows the muscle fiber direction.
Option 2 - Rehabilitation & Injury Prevention (for post-injury recovery or Achilles tendinitis management):
Electrode 1: Place it on the medial soleus, slightly lateral to the Achilles tendon.
Electrode 2: Position it on the lateral soleus to balance activation and prevent overloading of the Achilles tendon.
Option 3 - Recovery and Circulation Enhancement (for reducing muscle fatigue and improving post-exercise relaxation):
Electrode 1: Place it on the central soleus, aligned with the Achilles tendon but at least 3 cm away from it.
Electrode 2: Position it slightly lower, ensuring relaxation-focused stimulation. - Set the EMS device:
For Strengthening (Endurance & Postural Stability Development):
Frequency: 40-70 Hz
Pulse width: 250-350 µs
Intensity: Moderate, visible contractions without excessive discomfort.
Duration: 15-20 minutes.For Rehabilitation (Post-Injury or Weak Soleus Muscles):
Frequency: 10-30 Hz
Pulse width: 200-300 µs
Intensity: Mild contractions to restore function without excessive stress.
Duration: 15-25 minutes.For Recovery (Reducing Muscle Fatigue & Circulation Stimulation):
Frequency: 1-10 Hz
Pulse width: 150-250 µs
Intensity: Gentle tingling with minimal contractions.
Duration: 20-30 minutes. - Important: Avoid placing electrodes directly over the Achilles tendon or the bony structures of the ankle to prevent discomfort and ineffective stimulation.
Foot
EMS (Electrical Muscle Stimulation) for Foot Muscles is primarily used to strengthen intrinsic foot muscles, improve circulation, enhance mobility, and aid in rehabilitation. The foot consists of multiple small muscles, including the flexor digitorum brevis, abductor hallucis, and lumbricals, which play a crucial role in stability, arch support, and proper gait mechanics. EMS enhances neuromuscular activation, promoting greater muscle fiber recruitment, improved blood flow, and faster recovery from foot-related conditions.
EMS is effective for: foot muscle strengthening, plantar fascia rehabilitation, circulation improvement in cases of neuropathy, and reducing muscle fatigue from prolonged standing or walking. However, proper electrode placement and intensity settings are essential to avoid overstimulation of sensitive structures, such as the plantar nerves and Achilles tendon.
- Prepare the skin: Clean and dry the foot before applying electrodes. Ensure there are no cuts, blisters, or excessive calluses that might interfere with electrode adhesion.
- Select appropriate electrodes: Use small (2x2 cm) or medium (5x5 cm) electrodes to ensure precise stimulation of the foot muscles.
- Electrode positioning:
Option 1 - Foot Strengthening (for arch support and muscle endurance):
Electrode 1: Place it on the medial arch of the foot, near the abductor hallucis muscle.
Electrode 2: Position it on the lateral arch, near the flexor digitorum brevis, ensuring balanced stimulation.
Option 2 - Rehabilitation & Pain Relief (for plantar fasciitis or post-injury recovery):
Electrode 1: Place it on the heel pad, avoiding direct placement over the Achilles insertion.
Electrode 2: Position it under the metatarsal heads to activate the foot flexors and improve mobility.
Option 3 - Circulation Enhancement & Muscle Recovery (for neuropathy or post-exercise relaxation):
Electrode 1: Place it on the dorsal foot, near the extensor digitorum brevis.
Electrode 2: Position it along the plantar arch for blood flow improvement. - Set the EMS device:
For Strengthening (Arch Support & Muscle Activation):
Frequency: 40-70 Hz
Pulse width: 250-350 µs
Intensity: Moderate, visible muscle contractions without excessive discomfort.
Duration: 15-20 minutes.For Rehabilitation (Post-Injury or Plantar Fasciitis Relief):
Frequency: 10-30 Hz
Pulse width: 200-300 µs
Intensity: Mild contractions to stimulate recovery without excessive stress.
Duration: 15-25 minutes.For Circulation (Reducing Muscle Fatigue & Enhancing Blood Flow):
Frequency: 1-10 Hz
Pulse width: 150-250 µs
Intensity: Gentle tingling with minimal contractions.
Duration: 20-30 minutes. - Important: Avoid placing electrodes directly over the Achilles tendon or toe joints to prevent discomfort and ineffective stimulation.